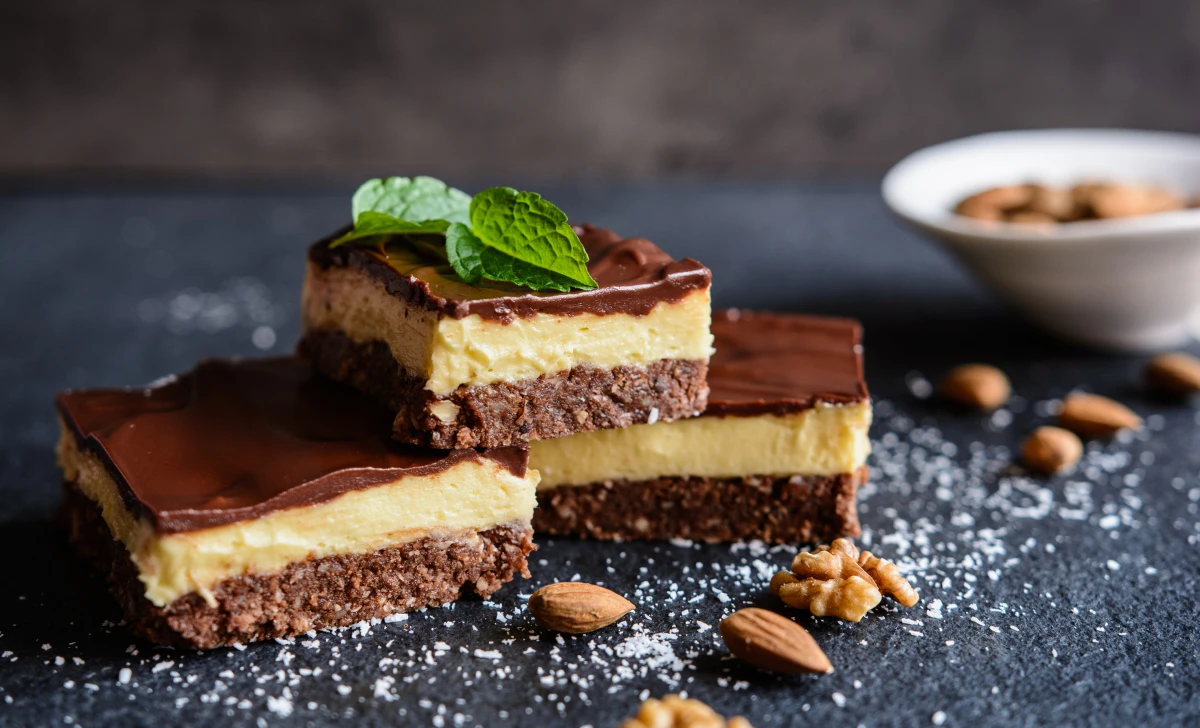
Welcome to the delightful world of Nanaimo Bars – a classic Canadian dessert that is sure to satisfy your sweet tooth! In this article, we will take you through the step-by-step process of creating these delectable treats. From the rich buttery base to the creamy custard filling, topped with a smooth chocolate layer, these bars are a true indulgence for any occasion. So, let’s dive right in and explore the Nanaimo Bar recipe!
[ez-toc]
History
The origins of Nanaimo Bars can be traced back to the beautiful city of Nanaimo, located on Vancouver Island in British Columbia, Canada. The exact date of their creation remains a bit of a mystery, but it is believed that these delectable bars first came into existence in the early 1950s.
The original recipe for Nanaimo Bars is said to have appeared in a local Nanaimo church cookbook. However, it is important to note that variations of similar bars can be found in various cookbooks and community recipe collections across Canada and the United States under different names.
Over the years, Nanaimo Bars have become an iconic Canadian dessert, loved by people from all walks of life. The city of Nanaimo even holds an annual Nanaimo Bar Trail event, where local bakeries and cafes showcase their unique twists on this beloved treat.
The popularity of Nanaimo Bars has transcended borders, and you can now find them in bakeries and dessert shops across the globe. These bars have become synonymous with Canadian cuisine and are often served at holiday gatherings, potlucks, and celebrations.
As the years passed, different variations of the original recipe have emerged. Some recipes incorporate additional ingredients, such as coconut, nuts, or flavored extracts, giving the bars a personalized touch while still maintaining the essence of the classic Nanaimo Bar.
Today, Nanaimo Bars continue to bring joy to dessert enthusiasts everywhere. Whether you’re a seasoned baker or a novice in the kitchen, trying your hand at making these delectable treats is sure to be a delightful and rewarding experience. So, grab your apron, gather the ingredients, and let’s embark on a delicious journey to savor the taste of Nanaimo Bars!
Time
| Step | Time (Approx.) |
|---|---|
| Making the Base | 20 minutes |
| Preparing the Filling | 15 minutes |
| Adding the Chocolate Layer | 10 minutes |
| Total Cooking and Preparation | 45 minutes |
Please note that the times provided are approximate and may vary depending on individual cooking skills and kitchen setup. Take your time and enjoy the process of creating these delicious Nanaimo Bars!
Ingredients
| Ingredients | Quantity for 2-Person Serving |
|---|---|
| For the Base | |
| Graham Cracker Crumbs | 1 cup |
| Sweetened Shredded Coconut | 1/2 cup |
| Chopped Walnuts or Pecans | 1/4 cup |
| Unsalted Butter, melted | 1/2 cup |
| Granulated Sugar | 2 tablespoons |
| For the Filling | |
| Unsalted Butter, softened | 1/4 cup |
| Heavy Cream | 2 tablespoons |
| Vanilla Custard Powder | 2 tablespoons |
| Powdered Sugar | 2 cups |
| For the Chocolate Topping | |
| Semi-Sweet Chocolate Chips | 1/2 cup |
| Unsalted Butter | 2 tablespoons |
Enjoy making these delightful Nanaimo Bars for yourself and your special someone!
Directions
Making the Base
- Prepare the Pan: Grease an 8×8 inch (20×20 cm) square baking pan with butter or line it with parchment paper for easy removal later.
- Mix Dry Ingredients: In a large mixing bowl, combine 1 cup of graham cracker crumbs, 1/2 cup of sweetened shredded coconut, and 1/4 cup of chopped walnuts or pecans.
- Add Wet Ingredients: Pour in 1/2 cup of melted unsalted butter and 2 tablespoons of granulated sugar into the dry mixture. Stir well until the ingredients are evenly combined.
- Press the Base: Transfer the mixture to the prepared baking pan. Using the back of a spoon or your fingers, firmly press the mixture into an even layer to form the base of the bars. Set aside.
Preparing the Filling
- Cream the Butter: In a separate mixing bowl, cream 1/4 cup of softened unsalted butter until it becomes smooth and creamy.
- Add Custard Powder: Gradually add 2 tablespoons of vanilla custard powder to the creamed butter while continuously mixing.
- Incorporate the Cream: Pour in 2 tablespoons of heavy cream and continue to mix until the ingredients are well blended.
- Sweeten the Filling: Gradually add 2 cups of powdered sugar to the mixture, beating until the filling is smooth and thick.
Adding the Chocolate Layer
- Melt Chocolate and Butter: In a microwave-safe bowl, melt 1/2 cup of semi-sweet chocolate chips and 2 tablespoons of unsalted butter. Stir until the mixture is smooth and glossy.
- Layer the Bars: Spread the creamy filling evenly over the prepared base in the baking pan.
- Chocolate Topping: Pour the melted chocolate mixture over the filling, carefully spreading it to cover the entire surface.
- Chill and Set: Place the pan in the refrigerator for at least 2 hours or until the bars are set.
Serving and Storage
- Slice and Serve: Once the Nanaimo Bars are set, remove them from the refrigerator. Using a sharp knife, cut the bars into squares or rectangles.
- Serve and Enjoy: Transfer the Nanaimo Bars to a serving plate and enjoy these delectable treats with your loved ones.
- Storage: Store any leftover Nanaimo Bars in an airtight container in the refrigerator for up to 5 days.
Now, you are ready to savor the delightful taste of Nanaimo Bars – a Canadian classic that will surely become a favorite in your household!
Equipment Required
Nutrition Information
| Nutrient | Amount per 2-Person Serving |
|---|---|
| Serving Size | 1 square (approx. 2×2 inch) |
| Calories | 350 kcal |
| Total Fat | 20g |
| – Saturated Fat | 10g |
| Cholesterol | 40mg |
| Sodium | 90mg |
| Total Carbohydrates | 40g |
| – Dietary Fiber | 2g |
| – Sugars | 28g |
| Protein | 4g |
Please note that the nutritional values are approximate and can vary based on the specific ingredients and brands used. It’s essential to be mindful of portion sizes when enjoying these delightful Nanaimo Bars, especially if you are watching your calorie intake. Enjoy in moderation!
Tips
- Properly Measure Ingredients: For accurate results, measure all the ingredients precisely, especially the powdered sugar for the filling, as it can significantly affect the texture.
- Even Base Layer: Press the base mixture firmly and evenly into the baking pan to create a sturdy foundation for the bars.
- Chill the Base: Before adding the filling, refrigerate the base for about 10-15 minutes to help it set.
- Room Temperature Butter: Make sure the butter for the filling is at room temperature, as it will blend more smoothly with the custard powder and cream.
- Cream the Filling Well: Take your time to thoroughly cream the butter for the filling to avoid any lumps in the custard mixture.
- Powdered Sugar Gradually: Add the powdered sugar slowly to the filling mixture while continuously mixing to achieve a smooth and lump-free texture.
- Use High-Quality Chocolate: Opt for good quality chocolate for the topping, as it will enhance the flavor of the Nanaimo Bars.
- Cool the Chocolate Mixture: Allow the melted chocolate and butter for the topping to cool slightly before pouring it over the filling to avoid melting the cream layer.
- Refrigeration Time: Refrigerate the assembled bars for at least 2 hours or until they are set before cutting them into pieces.
Pros & Cons
| Pros | Cons |
|---|---|
| ✔️ Delectable Canadian dessert | ❌ High in calories |
| ✔️ Easy to make | ❌ Contains saturated fats |
| ✔️ Perfect for special occasions | ❌ Not suitable for nut allergies |
| ✔️ Can be made ahead of time | ❌ Requires refrigeration time |
| ✔️ Customizable variations | ❌ Contains processed ingredients |
Conclusion
In conclusion, the Nanaimo Bars recipe offers a delightful journey into the world of Canadian desserts. With its rich buttery base, creamy custard filling, and smooth chocolate topping, these bars are a true indulgence that will leave your taste buds craving for more.
This recipe is not only easy to follow but also allows for personalization and creativity. Whether you prefer a classic version or want to experiment with different flavors and textures, Nanaimo Bars offer a perfect canvas for your culinary imagination.
While it’s important to be mindful of portion sizes and nutritional content, enjoying these delectable treats in moderation can add a touch of sweetness to any special occasion or simply be a delightful way to treat yourself and your loved ones.
So, why wait? Put on your apron, gather the ingredients, and embark on this delicious adventure. Whether you’re an experienced baker or a novice in the kitchen, the Nanaimo Bars recipe is sure to satisfy your cravings and impress your taste testers.
Indulge in the flavors of Canada and create lasting memories with this beloved Canadian dessert. Get ready to savor the sweetness and share the joy of Nanaimo Bars with family and friends. Happy baking and bon appétit!
Facts
- 🇨🇦 Fact 1: Canadian Icon 🍁
- Nanaimo Bars are a quintessential Canadian dessert! 🇨🇦 Originating from Nanaimo, British Columbia, these sweet treats have become a symbol of Canadian culinary heritage, celebrated and enjoyed across the country.
- 🍬 Fact 2: A Sweet Mystery 🕵️♂️
- The true origin of Nanaimo Bars remains a mystery! 🍬 While the first known recipe appeared in a local Nanaimo cookbook in the 1950s, variations of similar bars have been found in other community cookbooks throughout North America under different names.
- 🍰 Fact 3: Nanaimo Bar Trail 🚶♀️
- Nanaimo has an official Nanaimo Bar Trail! 🍰 The city of Nanaimo embraces its iconic dessert by offering a self-guided tour to explore various cafes and bakeries, each showcasing their unique and delicious versions of Nanaimo Bars.
- 🎂 Fact 4: A Layered History 🍰
- Nanaimo Bars have a layered history! 🎂 The recipe’s layers reflect the diverse history of the region – the base represents the coal miners’ hard work, the custard layer symbolizes the city’s prosperity, and the chocolate topping signifies the beautiful coastal landscape.
- 🏅 Fact 5: Nanaimo Bar Contest 🏆
- There’s an annual Nanaimo Bar contest! 🏅 Every year, Nanaimo hosts a “Nanaimo Bar Challenge,” inviting both amateur and professional bakers to showcase their creative twists on this classic dessert, celebrating the community’s love for Nanaimo Bars.
FAQ’s
Can I make Nanaimo Bars ahead of time?
Absolutely! Nanaimo Bars are perfect for preparing in advance. Simply store them in an airtight container in the refrigerator for up to 5 days before serving.
Can I freeze Nanaimo Bars?
Yes, you can freeze Nanaimo Bars for longer storage. Ensure they are well wrapped or placed in a freezer-safe container. Thaw them in the refrigerator before serving.
Can I use a different type of chocolate for the topping?
Certainly! While semi-sweet chocolate is traditional, feel free to use dark chocolate or milk chocolate if you prefer a different taste.
How many servings does this recipe yield?
This recipe makes approximately 16 squares of Nanaimo Bars, perfect for a 2-person serving to enjoy over multiple occasions.
Can I make a gluten-free version of Nanaimo Bars?
Absolutely! Use gluten-free graham crackers or crushed gluten-free cookies for the base to make the recipe suitable for gluten-sensitive individuals.
Is there a nut-free option for the recipe?
Yes! If you have nut allergies, simply omit the chopped nuts from the base, or replace them with crushed gluten-free pretzels for added texture.
Can I use a substitute for custard powder?
Yes, if you can’t find custard powder, you can use instant vanilla pudding mix as a substitute in the filling.
Are Nanaimo Bars too sweet?
The sweetness of Nanaimo Bars can be adjusted by reducing the amount of powdered sugar in the filling or using dark chocolate for a less sweet topping.
Can I add fruit to the recipe for extra flavor?
While it’s not traditional, you can experiment with adding dried fruit like cranberries or cherries to the base or the filling for a fruity twist.
Can I make a vegan version of Nanaimo Bars?
Yes, you can! Use dairy-free substitutes for butter and cream, along with vegan chocolate, to create a delicious vegan-friendly version.






Leave a Review