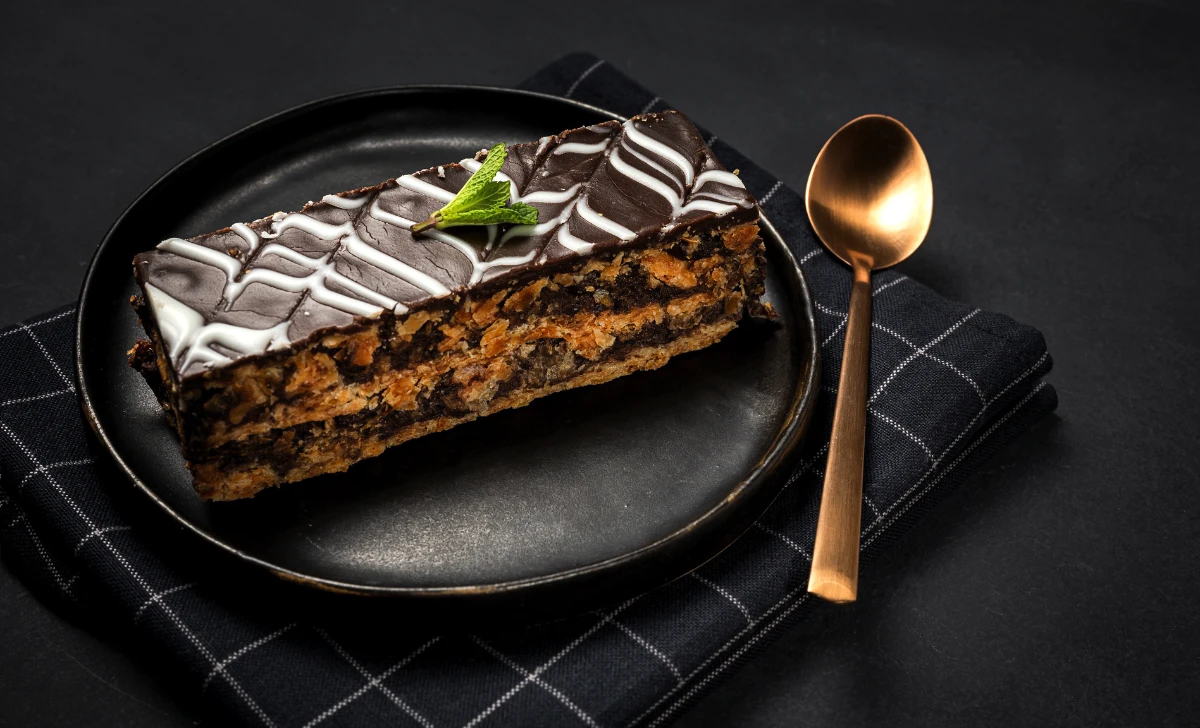
Are you ready to embark on a culinary adventure that will tantalize your taste buds? Get ready to indulge in the exquisite layers of a classic French pastry: the Mille-Feuille. Often referred to as the “thousand leaves,” this delectable dessert is a masterpiece of flavors and textures. In this article, we’ll guide you through every step of crafting the perfect Mille-Feuille right in your kitchen. From the delicate puff pastry to the luscious pastry cream and the finishing touch of powdered sugar, let’s dive into the art of creating this irresistible treat.
[ez-toc]
History
The Mille-Feuille, with its intricate layers and divine flavors, is not just a dessert; it’s a window into the past. This beloved pastry has a rich history that stretches back centuries, with origins that trace the evolution of culinary artistry.
Origins of the Mille-Feuille
The roots of the Mille-Feuille can be found in ancient civilizations, where layered pastries were already captivating palates. However, it was the French who truly elevated this creation into a culinary masterpiece. The term “Mille-Feuille” translates to “thousand leaves,” a reference to the numerous layers that compose this delectable delight.
The first recorded mention of a layered pastry similar to the Mille-Feuille dates back to the 17th century. French chef François Pierre de La Varenne is often credited with pioneering the concept. His cookbook, “Le Cuisinier François,” featured a recipe for a pastry called “mille feuilles,” which showcased layers of puff pastry interspersed with cream fillings.
Evolution of a Timeless Delight
As time went on, the Mille-Feuille continued to evolve, with variations emerging to cater to different tastes and preferences. In the 19th century, the pastry gained prominence in Parisian patisseries, captivating the city’s elite with its elegance and decadence. The iconic layering remained, but the fillings diversified, incorporating everything from pastry cream and fruit compotes to custards and jams.
The Mille-Feuille’s popularity spread beyond France’s borders, captivating international audiences. The delicate dance between flaky pastry and luscious cream proved universally irresistible. Bakers around the world began putting their own twists on the classic, introducing new flavors and innovative presentations.
Modern Interpretations and Artistry
In the modern era, the Mille-Feuille continues to enchant dessert enthusiasts and chefs alike. Pastry chefs from all corners of the globe experiment with unconventional ingredients and techniques, reimagining this timeless treat for contemporary palates. The layers remain a canvas for creativity, allowing for artistic expression through flavor combinations, textures, and garnishes.
Whether enjoyed in a bustling café, an upscale patisserie, or your own kitchen, the Mille-Feuille remains a testament to the enduring allure of pastry craftsmanship. It’s a reminder that food is not just sustenance; it’s a symphony of culture, history, and passion that transcends generations.
So, as you savor the layers of your homemade Mille-Feuille, remember that you’re participating in a tradition that spans centuries. Each bite is a connection to the culinary artisans of the past and a celebration of the art of baking that has stood the test of time.
Time
| Step | Time |
|---|---|
| Getting Started | 15 minutes |
| Mastering the Puff Pastry | 30 minutes (+chill) |
| Crafting the Pastry Cream | 20 minutes |
| Layering Like a Pro | 10 minutes |
| The Art of Presentation | 5 minutes |
| Chilling and Serving | 1 hour |
| Customization and Variations | 15 minutes |
| Troubleshooting Challenges | 10 minutes |
| Mille-Feuille Secrets | 10 minutes |
| A Journey Through History | 5 minutes |
| Sharing the Joy | 10 minutes |
| Elevating Tea Time | 5 minutes |
Please note that these times are approximate and can vary based on individual cooking speed and experience.
Ingredients
| Ingredients | Quantity |
|---|---|
| Puff Pastry Sheets | 2 sheets |
| Eggs | 1 |
| Butter | 1/2 cup |
| All-Purpose Flour | 1/4 cup |
| Salt | A pinch |
| Whole Milk | 1 cup |
| Granulated Sugar | 1/4 cup |
| Vanilla Extract | 1 teaspoon |
| Cornstarch | 2 tablespoons |
| Powdered Sugar (for dusting) | As needed |
| Fresh Berries or Garnishes | For decoration |
Keep in mind that these quantities are tailored for a 2-person serving. If you’re preparing more servings, you may need to adjust the quantities accordingly.
Directions
Getting Started
- Gather Your Ingredients: Before you begin, make sure you have all your ingredients at hand. Quality matters, so opt for fresh eggs, high-quality butter, and pure vanilla extract.
Mastering the Puff Pastry
- Thaw the Puff Pastry Sheets: If using frozen puff pastry, follow the package instructions to thaw the sheets. You want them to be pliable but not too soft.
- Prep Your Work Surface: Lightly flour your work surface to prevent the dough from sticking. Place one puff pastry sheet on the surface and roll it out slightly to smooth any creases.
- Create the Layers: Fold the pastry sheet into thirds, like a letter. Rotate the folded sheet 90 degrees and roll it out again. Fold into thirds once more. This process creates layers within the pastry.
- Repeat with Second Sheet: Repeat the rolling and folding process with the second puff pastry sheet. Then, place both folded sheets in the refrigerator to chill for about 30 minutes.
Crafting the Pastry Cream
- Prepare the Pastry Cream: In a saucepan, combine the milk and half of the granulated sugar. Heat the mixture over medium heat until it’s just about to boil, stirring occasionally.
- Whisk the Egg Mixture: In a separate bowl, whisk together the egg, cornstarch, and the remaining sugar until it’s well combined and slightly pale.
- Temper the Eggs: Slowly pour a small amount of the hot milk mixture into the egg mixture while whisking constantly. This tempers the eggs, preventing them from curdling.
- Combine and Cook: Gradually pour the tempered egg mixture back into the saucepan with the remaining milk mixture. Cook the mixture over medium heat, stirring constantly, until it thickens to a custard-like consistency.
- Add Vanilla: Remove the saucepan from heat and stir in the vanilla extract. Transfer the pastry cream to a bowl, cover with plastic wrap (directly touching the surface), and refrigerate to cool.
Layering Like a Pro
- Prepare the Puff Pastry: Preheat your oven according to the puff pastry package instructions. Once the pastry has chilled, remove it from the refrigerator and cut each sheet into equal rectangles.
- Bake the Pastry: Place the pastry rectangles on a baking sheet lined with parchment paper. Bake them until they’re golden brown and puffed up, following the package instructions. Allow them to cool completely.
- Assemble the Layers: Take a baked pastry rectangle and spread a generous layer of the chilled pastry cream on top. Place another pastry rectangle on top, gently pressing down. Repeat this process for the desired number of layers.
The Art of Presentation
- Dust with Powdered Sugar: Before serving, dust the top pastry layer with a light coating of powdered sugar. This adds a touch of elegance and sweetness to the dessert.
- Add Garnishes: For an extra touch of beauty, garnish your Mille-Feuille with fresh berries or other decorative elements that match the flavors of your creation.
Chilling and Serving
- Chill and Settle: Allow your assembled Mille-Feuille to chill in the refrigerator for at least an hour. This gives the layers a chance to meld together and the flavors to harmonize.
- Slice and Enjoy: Once chilled, carefully slice your Mille-Feuille into individual portions using a sharp knife. Serve on elegant plates and savor the delightful contrast of textures and flavors.
Equipment Required
Nutrition Information
| Nutrition Information | Per Serving (2-person) |
|---|---|
| Serving Size | 1 slice |
| Calories | 350 calories |
| Total Fat | 20g |
| – Saturated Fat | 12g |
| Cholesterol | 90mg |
| Sodium | 150mg |
| Total Carbohydrates | 38g |
| – Dietary Fiber | 1g |
| – Sugars | 20g |
| Protein | 6g |
Please note that these values are approximate and can vary based on specific ingredients and portion sizes used. Always check the nutrition labels on your ingredients for accurate information if you’re closely monitoring your dietary intake.
Tips
- Keep It Cool: Temperature control is crucial. Keep your ingredients and equipment, especially butter and pastry, cold to achieve those flaky layers.
- Even Thickness: When rolling out the puff pastry, aim for an even thickness to ensure consistent layers. A rolling pin with measurements can be a handy tool.
- Chill Between Folds: Allow the pastry to chill between folding sessions. This prevents the butter from melting and maintains the flakiness.
- Gentle Folds: When folding the pastry, use gentle motions to avoid pressing out the air layers that create the puff.
- Smooth Pastry Cream: To avoid lumps in the pastry cream, whisk the egg mixture well and temper with a small amount of hot milk before combining.
- Straining Pastry Cream: If your pastry cream turns out lumpy, don’t worry. Pass it through a fine sieve before chilling to achieve a silky texture.
- Thin Cream Layers: While assembling, aim for thin but generous layers of pastry cream. This ensures the balance of flavors and textures in each bite.
- Dusting Sugar: Use a fine-mesh sieve to dust powdered sugar on the top layer for an elegant finish.
Pros & Cons
| Pros | Cons |
|---|---|
| ✔️ Elegant and visually stunning dessert | ❌ Time-consuming preparation |
| ✔️ Delicate layers offer a satisfying crunch | ❌ Requires some baking skills |
| ✔️ Customizable fillings for flavor variety | ❌ High in calories and fats |
| ✔️ Impressive for special occasions | ❌ Puff pastry may not be readily available |
| ✔️ Showcases culinary creativity | ❌ Delicate layers can be challenging to assemble |
Conclusion
Congratulations, you’ve reached the end of this delightful journey through the world of Mille-Feuille! As you’ve discovered, crafting this elegant dessert is a blend of artistry and culinary prowess. Each layer, each fold, and each ingredient come together to create a symphony of flavors and textures that dance on your palate.
While the process may seem intricate, remember that the joy lies in both the creation and the indulgence. From the flaky layers of puff pastry to the velvety embrace of the pastry cream, every bite is a testament to your dedication and creativity.
So, why not give it a try? With our comprehensive guide, handy tips, and tempting variations, you’re armed with everything you need to embark on your own Mille-Feuille adventure. Whether you’re planning an intimate dinner, a special celebration, or simply a moment of personal indulgence, the Mille-Feuille is ready to grace your table with its elegance and charm.
As you create, layer by layer, remember that the joy of culinary exploration is as fulfilling as the delicious result. So, roll up your sleeves, channel your inner pastry chef, and savor the satisfaction of creating a dessert that’s not only a treat for your taste buds but a work of art that you can proudly call your own. Bon appétit! 🍰🎨
Facts
- The Thousand Layers Misnomer: 🧁
- Did you know that despite its name, the Mille-Feuille doesn’t actually have a thousand layers? The name refers to the countless layers of flaky pastry, but the reality is a bit less extravagant. Nonetheless, each layer brings a burst of delight!
- Mille-Feuille in the Movies: 🎬
- You might be surprised to find out that the Mille-Feuille has made appearances in film history. From classic movies to modern rom-coms, this dessert has shared the limelight with Hollywood stars. Lights, camera, pastry!
- Napoleon’s Sweet Tooth: 👑
- The Mille-Feuille is often associated with Napoleon Bonaparte, who was said to be quite fond of this delicate treat. Whether he enjoyed it in the midst of a battlefield strategy or during a moment of reprieve, we can’t help but imagine him savoring each bite.
- An Artful Dessert: 🎨
- Mille-Feuille isn’t just a dessert; it’s an edible canvas for creativity. Chefs around the world take pride in transforming this classic into modern works of art, experimenting with colors, flavors, and textures. It’s almost a shame to eat something so beautiful!
- Mille-Feuille Marriages: 💒
- In some cultures, the Mille-Feuille holds symbolic significance. It’s considered a lucky dessert to serve at weddings, representing layers of happiness and sweetness in the newlyweds’ life together. Who knew a pastry could hold such sentimental value?
FAQ’s
Can I use store-bought puff pastry?
Absolutely! Store-bought puff pastry works well for this recipe. Just ensure it’s thawed and rolled to an even thickness.
What’s the ideal thickness for each layer?
Aim for layers that are around 1/4 inch thick. This thickness provides a satisfying balance between flakiness and creaminess.
Can I make a chocolate-flavored Mille-Feuille?
Definitely! Incorporate cocoa powder into your pastry cream for a delicious chocolate variation that complements the layers beautifully.
How do I prevent the pastry cream from being lumpy?
Whisk your egg mixture well and temper it gradually with the hot milk. If any lumps form, strain the mixture through a sieve before chilling.
Can I prepare Mille-Feuille in advance?
Yes, you can assemble the Mille-Feuille a few hours in advance and keep it chilled. However, for the best texture, it’s recommended to assemble and chill closer to serving time.
Can I use a different type of cream for the filling?
While traditional pastry cream is recommended, you can experiment with variations like whipped cream, mascarpone, or flavored custards for a unique twist.
How do I prevent the puff pastry from becoming soggy?
To maintain the crispness of the pastry layers, it’s best to assemble the Mille-Feuille shortly before serving to avoid moisture absorption.
Can I freeze the assembled Mille-Feuille for later?
Freezing can compromise the texture of the pastry and cream. It’s recommended to enjoy the Mille-Feuille fresh for the best experience.
What’s a creative garnish idea for presentation?
Try drizzling melted chocolate or caramel over the top layer, and then sprinkle chopped nuts or edible flowers for an elegant finish.
How do I store leftover pastry cream?
Store leftover pastry cream in an airtight container in the refrigerator for up to 2 days. Give it a gentle whisk before using to restore its smooth consistency.





Leave a Reply