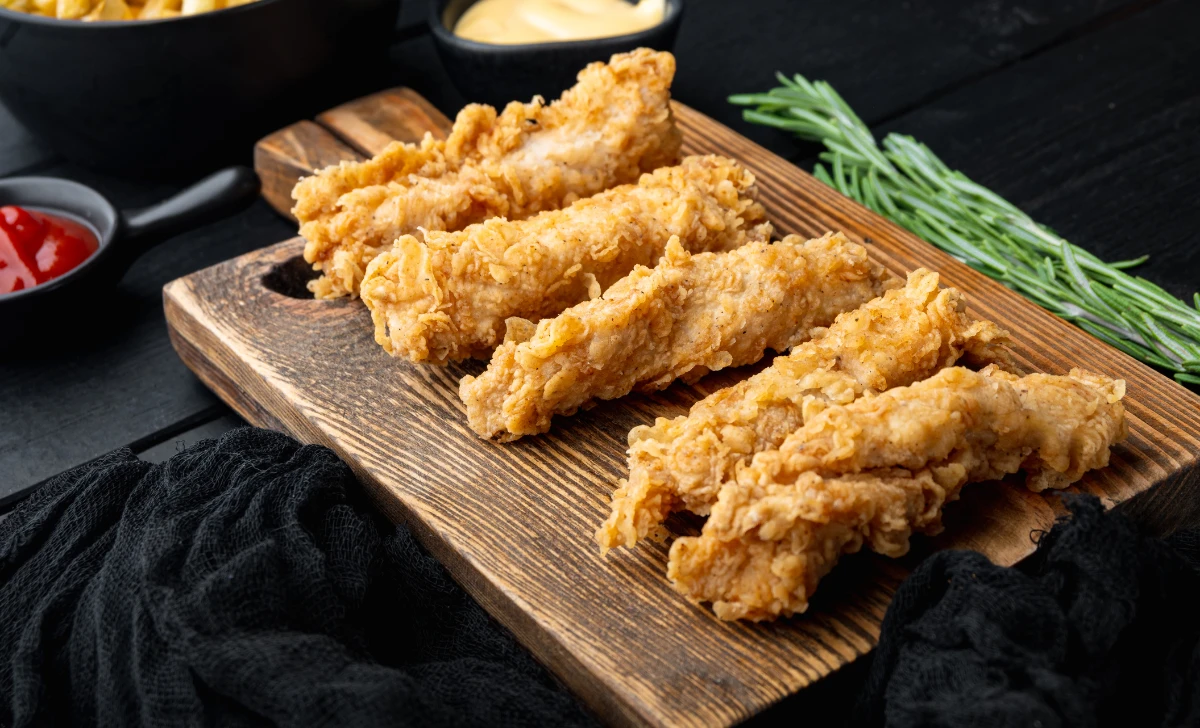
Chicken tenders, also known as chicken fingers or chicken strips, are a beloved dish loved by people of all ages. These succulent, boneless pieces of chicken are not only delicious but also easy to prepare at home. In this article, we’ll explore the history and popularity of chicken tenders and provide a step-by-step guide to making a mouthwatering batch of these tasty treats. Whether you’re a seasoned cook or a novice in the kitchen, this chicken tender recipe is sure to become a favorite in your household.
[ez-toc]
History
The history of the chicken tenders recipe can be traced back to the 1980s in the United States. Before that time, chicken tenders were not commonly recognized as a separate dish. Chicken, in general, has been a staple in various cuisines for centuries, but the specific concept of chicken tenders as we know them today is a more recent culinary development.
The emergence of chicken tenders as a distinct and popular dish can be attributed to the fast-food industry. It is believed that one particular restaurant chain was the pioneer in introducing chicken tenders as a dedicated item on their menu. These tender, boneless strips of chicken were initially offered as a child-friendly option, as they were easy to eat and less messy compared to other chicken cuts.
As more families frequented fast-food chains and discovered the convenience and appeal of chicken tenders, their popularity soared. Not only were they a hit with children, but adults also enjoyed the simplicity and taste of this new dish. As a result, other fast-food restaurants quickly followed suit and added chicken tenders to their menus.
The success of chicken tenders in fast-food establishments led to their widespread popularity in the restaurant industry. Soon, they started appearing on the menus of casual dining restaurants, family-friendly eateries, and even high-end restaurants, each putting their unique spin on the recipe.
With the rise of home cooking and the internet, the chicken tenders recipe gained even more momentum. Home cooks experimented with various coatings, seasonings, and cooking methods to create their version of the perfect chicken tenders. Online cooking forums and social media platforms further contributed to the sharing of recipes and cooking tips.
Today, chicken tenders have become a beloved classic in households around the world. They are a go-to option for quick weeknight dinners, game-day snacks, and party appetizers. Whether served with a side of dipping sauce, in a sandwich, or on top of a salad, chicken tenders continue to be a crowd-pleaser for all generations.
As the culinary landscape evolves, it is likely that new variations and flavor profiles of chicken tenders will continue to emerge. However, the humble beginnings of this beloved recipe can be traced back to those early days in the 1980s when a simple idea at a fast-food restaurant took the world of comfort food by storm.
Time
| Step | Time |
|---|---|
| Preparation of Chicken | 15 minutes |
| Creating the Coating | 10 minutes |
| Frying the Chicken Tenders | 20 minutes |
| Baking Option for Healthier Tenders | 25 minutes |
| Total Cooking and Preparation Time | 70 minutes |
Please note that the times mentioned above are approximate and may vary based on individual cooking skills and equipment used. It’s essential to ensure that the chicken is cooked thoroughly and reaches a safe internal temperature before serving. Enjoy your delicious homemade chicken tenders!
Ingredients
| Ingredients | Quantity |
|---|---|
| Chicken Breast (boneless, skinless) | 2 pieces (about 12 oz/340g) |
| All-Purpose Flour | 1/2 cup |
| Eggs | 2 large |
| Milk | 1/4 cup |
| Bread Crumbs (or Panko) | 1 cup |
| Parmesan Cheese (grated, optional) | 1/4 cup |
| Salt | 1 teaspoon |
| Black Pepper | 1/2 teaspoon |
| Paprika | 1/2 teaspoon |
| Garlic Powder | 1/2 teaspoon |
| Onion Powder | 1/2 teaspoon |
| Vegetable Oil (for frying) | 2 cups |
These ingredients are for the basic chicken tenders recipe. Feel free to customize the seasonings and coatings according to your preferences. Enjoy your delicious homemade chicken tenders!
Directions
1. Preparation of Chicken
- Start by preparing the chicken breast. Trim off any excess fat and cut the chicken into long, thin strips, about 1 inch wide. Pat them dry with paper towels to remove any excess moisture.
2. Creating the Coating
- In a shallow bowl or dish, combine the all-purpose flour with salt, black pepper, paprika, garlic powder, and onion powder. Mix well to evenly distribute the seasonings.
- In a separate bowl, beat the eggs and mix in the milk until well combined.
- In another shallow bowl or dish, combine the bread crumbs (or Panko) with grated Parmesan cheese (if using). This will create the final coating for the chicken tenders.
3. Frying the Chicken Tenders
- In a large skillet or frying pan, heat the vegetable oil over medium-high heat. You can test if the oil is hot enough by sprinkling a few bread crumbs into it. If they sizzle and float, the oil is ready.
- Dip each chicken strip into the seasoned flour, coating it evenly. Shake off any excess flour.
- Next, dip the floured chicken strip into the egg and milk mixture, ensuring it is well coated.
- Finally, coat the chicken strip with the bread crumb mixture, pressing gently to adhere the crumbs to the chicken.
- Carefully place the coated chicken tender into the hot oil. Fry for about 3-4 minutes on each side or until the chicken is golden brown and cooked through. Avoid crowding the pan; fry the tenders in batches if necessary.
- Once cooked, remove the chicken tenders from the oil and place them on a plate lined with paper towels to absorb any excess oil.
4. Baking Option for Healthier Tenders
- For a healthier alternative, you can bake the chicken tenders instead of frying them. Preheat your oven to 400°F (200°C).
- After coating the chicken tenders with the breadcrumb mixture, place them on a baking sheet lined with parchment paper.
- Bake the tenders for 15-20 minutes, turning them over halfway through to ensure even cooking.
5. Tips for Perfectly Crispy Chicken Tenders
- To achieve maximum crispiness, ensure the oil is hot enough before frying the tenders.
- Avoid overcrowding the pan while frying to prevent the chicken tenders from becoming soggy.
- For extra flavor, add your favorite seasonings to the breadcrumb mixture.
- If you have time, let the coated chicken tenders rest on a baking sheet for 10 minutes before frying or baking; this will help the coating adhere better.
6. Serving Suggestions
- Serve the freshly cooked chicken tenders with your favorite dipping sauces, such as ketchup, honey mustard, or barbecue sauce.
- Accompany the tenders with a side of crispy french fries, coleslaw, or a refreshing green salad.
Enjoy your homemade chicken tenders, crispy on the outside, tender and flavorful on the inside!
Equipment Required
Nutrition Information
| Nutrition Information | Amount Per Serving |
|---|---|
| Serving Size | 2 chicken tenders |
| Calories | 380 kcal |
| Total Fat | 17g |
| – Saturated Fat | 3.5g |
| – Trans Fat | 0g |
| Cholesterol | 200mg |
| Sodium | 570mg |
| Total Carbohydrates | 25g |
| – Dietary Fiber | 1g |
| – Sugars | 1g |
| Protein | 30g |
Please note that the nutrition information provided above is approximate and can vary based on the specific ingredients and brands used in the recipe. Nutritional values may also change depending on any variations or substitutions made in the preparation of the chicken tenders.
Tips
- Choosing the Right Chicken: Opt for boneless, skinless chicken breasts for the best results. They are easy to work with and cook quickly.
- Uniform Thickness: Try to cut the chicken strips into similar thicknesses to ensure even cooking.
- Brine for Extra Juiciness: Consider brining the chicken tenders before coating them. A simple brine of water, salt, and sugar for 30 minutes to an hour can add moisture and flavor to the chicken.
- Double Coating for Extra Crunch: For an even crispier texture, you can double coat the chicken tenders by dipping them in the egg mixture and breadcrumbs twice.
- Let Coated Tenders Rest: After coating the chicken tenders, let them rest on a baking sheet for a few minutes. This allows the coating to adhere better and results in a crispier exterior.
- Temperature of Oil: Ensure the oil is heated to the right temperature before frying. Use a candy thermometer to maintain the oil temperature around 350°F (175°C) for ideal frying.
- Baking Tips: If baking the tenders, preheat the oven and use a wire rack on the baking sheet to promote even browning and avoid a soggy bottom.
- Custom Seasoning: Feel free to customize the seasoning blend to suit your taste preferences. Add herbs like thyme, oregano, or chili flakes for an extra kick.
- Buttermilk Soak: For a tender and tangy variation, soak the chicken tenders in buttermilk for a few hours before coating and cooking.
- Gluten-Free Option: Substitute the all-purpose flour and breadcrumbs with gluten-free alternatives for those with dietary restrictions.
- Air Fryer Option: Instead of frying or baking, you can use an air fryer to achieve crispy chicken tenders with less oil.
Pros & Cons
| Pros | Cons |
|---|---|
| ✅ Delicious and Flavorful | ❌ High in Calories |
| ✅ Easy and Quick to Prepare | ❌ Fried Option may be Unhealthy |
| ✅ Versatile and Customizable | ❌ Can be Messy to Coat |
| ✅ Family-Friendly Dish | ❌ Requires Frying Equipment |
| ✅ Perfect for Kids and Parties | ❌ May not be Suitable for Dietary Restrictions |
Conclusion
In conclusion, the Chicken Tenders recipe is a delightful and mouthwatering dish that is sure to please both the young and the young at heart. With its crispy and flavorful coating, tender and juicy chicken, and endless possibilities for customization, this recipe has become a beloved classic for many households.
Preparing these delectable chicken tenders is a breeze, making it an ideal choice for busy weeknights or impromptu gatherings with friends and family. The straightforward step-by-step guide ensures that even novice cooks can achieve impressive results with ease.
Whether you choose to fry them for that indulgent and crispy texture or opt for the healthier baking option, chicken tenders are a versatile canvas for your culinary creativity. Experiment with different seasonings, coatings, and dipping sauces to make this dish uniquely your own.
So, why not take a culinary adventure and treat yourself and your loved ones to the delight of homemade chicken tenders? Whether it’s for a fun family dinner, a game-day snack, or a party appetizer, this recipe is sure to be a hit.
Unlock the flavorful potential of this classic dish, and dive into a world of comfort and satisfaction with every bite. Give this Chicken Tenders recipe a try, and savor the joy of creating a restaurant-quality meal right in the comfort of your own kitchen. Your taste buds will thank you!
Facts
- 1. The Birth of a Kid-Friendly Favorite 🎉
- The concept of chicken tenders was born out of the desire to create a kid-friendly dish that was both tasty and easy to eat. Fast-food restaurants in the 1980s recognized the potential of this idea, and thus, chicken tenders became a beloved staple on children’s menus across the country.
- 2. The Great Tenders Boom 💥
- Since their introduction, chicken tenders have experienced a meteoric rise in popularity, becoming a staple not only in fast-food chains but also in casual and fine dining establishments. Their irresistible combination of crunchy coating and tender chicken has captured the hearts and taste buds of people of all ages.
- 3. A World of Flavorful Variations 🌍🍴
- While the classic chicken tenders recipe is undeniably delicious, cooks worldwide have embraced the versatility of this dish, creating a multitude of mouthwatering variations. From spicy buffalo tenders to exotic Asian-inspired flavors, there’s a chicken tenders recipe to satisfy every palate.
- 4. Crunchy vs. Oven-Baked Debate 🍽️
- The debate over the best way to cook chicken tenders continues to spark lively conversations among cooking enthusiasts. Some swear by the traditional frying method for that crispy exterior, while health-conscious cooks opt for baking in the oven to reduce oil content while maintaining a satisfying crunch.
- 5. Beyond the Dip: Creative Pairings 🌈🍽️
- Chicken tenders aren’t just about dipping sauces! As this dish has evolved, innovative chefs have paired them with unexpected sides and accompaniments. Think chicken tender sliders with coleslaw, chicken tender tacos with fresh salsa, or even chicken tender-stuffed sandwiches—each bite is a delightful adventure!
FAQ’s
Can I use chicken thighs instead of chicken breast for the recipe?
Yes, you can use boneless, skinless chicken thighs as a substitute. They will result in slightly juicier and more flavorful tenders.
How can I make the chicken tenders gluten-free?
To make gluten-free chicken tenders, use gluten-free all-purpose flour and breadcrumbs made from gluten-free bread or cornflakes.
Can I prepare the chicken tenders in advance and freeze them?
Yes, you can freeze the uncooked, breaded chicken tenders. Place them on a baking sheet in a single layer, freeze until solid, then transfer to an airtight container or freezer bag for up to 3 months. Thaw before frying or baking.
What can I serve as dipping sauces for the chicken tenders?
Chicken tenders pair well with a variety of dipping sauces such as ketchup, barbecue sauce, honey mustard, ranch dressing, or sweet chili sauce.
Can I use an air fryer to cook the chicken tenders?
Yes, you can use an air fryer for a healthier option. Preheat the air fryer, lightly spray the tenders with oil, and cook at 375°F (190°C) for about 10-12 minutes, flipping halfway through.
How can I add a spicy kick to the chicken tenders?
You can add cayenne pepper, hot sauce, or red pepper flakes to the seasoning blend for a spicier version of the chicken tenders.
Can I marinate the chicken tenders before coating them?
While marinating is not traditional for chicken tenders, you can marinate them in buttermilk or a seasoned liquid for added flavor and tenderness.
How do I know if the chicken tenders are cooked thoroughly?
Use a meat thermometer to check the internal temperature. Chicken tenders should reach 165°F (74°C) to ensure they are fully cooked.
Can I make a larger batch and store leftovers?
Absolutely! Leftover chicken tenders can be refrigerated for up to 3 days. Reheat them in the oven or air fryer for the best results.
What side dishes go well with chicken tenders?
Chicken tenders pair nicely with a variety of sides, such as French fries, sweet potato fries, coleslaw, green salad, macaroni and cheese, or steamed vegetables.



Leave a Review