Who doesn’t love a rich and indulgent chocolate cake? And when you add the nutty goodness of hazelnuts to it, the result is simply irresistible. In this article, we’ll guide you through a mouthwatering Chocolate Hazelnut Cake recipe that will leave your taste buds dancing with joy. So, put on your apron, grab your mixing bowl, and let’s get baking!
[ez-toc]
History
The history of the Chocolate Hazelnut Cake recipe is a tale of delightful culinary innovation and the harmonious blending of flavors that have stood the test of time.
The origin of chocolate cake can be traced back to ancient civilizations in Mesoamerica, where the indigenous people cultivated cacao trees and used cacao beans to prepare a bitter, spicy beverage. The Mayans and Aztecs held cacao in high regard and believed it had divine properties.
It wasn’t until the 18th century that chocolate was introduced to Europe and underwent significant transformations in its preparation. As chocolate became more widely available, bakers and confectioners began experimenting with incorporating it into their recipes.
The first known chocolate cake recipes date back to the mid-18th century. These early versions were quite different from the moist and fluffy chocolate cakes we enjoy today. They were often dense and more akin to a chocolate bread or pudding.
The addition of nuts to cakes is also a centuries-old tradition. Hazelnuts, being native to Europe, were readily available and commonly used in various desserts. Their earthy flavor and crunchy texture made them a popular choice for both sweet and savory dishes.
The combination of chocolate and hazelnuts likely occurred through experimentation in the kitchen, as talented bakers sought to create new and exciting flavor profiles. The first recorded reference to a chocolate and hazelnut combination is found in an Italian cake known as “Torta Gianduia” from the Piedmont region. This cake featured a blend of ground hazelnuts and chocolate, and it later inspired the creation of the famous Italian spread, Nutella.
As chocolate hazelnut spreads gained popularity in the mid-20th century, bakers started incorporating them into cake recipes, resulting in the delectable Chocolate Hazelnut Cake we know today. The marriage of rich chocolate, roasted hazelnuts, and velvety frosting proved to be a match made in dessert heaven.
With time, the recipe evolved and spread across the globe, becoming a favorite among home bakers and professional pastry chefs alike. The internet age further popularized this recipe, making it easily accessible to a global audience.
Today, the Chocolate Hazelnut Cake continues to captivate dessert lovers, making appearances in bakeries, cafes, and home kitchens around the world. Its popularity is a testament to the enduring appeal of this delectable combination of flavors and textures. Whether enjoyed at a celebration, a family gathering, or as a well-deserved treat, the Chocolate Hazelnut Cake remains a cherished dessert with a rich and delicious history.
Time
| Step | Time (approx.) |
|---|---|
| Preparing the Hazelnuts | 35 minutes |
| Making the Cake Batter | 20 minutes |
| Baking the Cake | 25-30 minutes |
| Making the Chocolate-Hazelnut Frosting | 15 minutes |
| Decoration | 10 minutes |
Please note that the cooking and preparation times mentioned above are approximate and can vary depending on individual cooking skills and kitchen setup. It’s always a good idea to keep an eye on the progress during each step to ensure the best results. Happy baking!
Ingredients
| Ingredients | Quantity |
|---|---|
| Roasted Hazelnuts | 1/2 cup |
| All-Purpose Flour | 1 cup |
| Unsweetened Cocoa Powder | 1/2 cup |
| Baking Powder | 1/2 teaspoon |
| Baking Soda | 1/2 teaspoon |
| Salt | 1/4 teaspoon |
| Unsalted Butter | 1/2 cup |
| Granulated Sugar | 3/4 cup |
| Large Eggs | 2 |
| Vanilla Extract | 1/2 teaspoon |
| Buttermilk | 3/4 cup |
| Strong Brewed Coffee | 1/4 cup |
| Hazelnut Spread (Nutella) | 1/2 cup |
| Powdered Sugar | 1 cup |
| Heavy Cream | 2-3 tablespoons |
| Chopped Hazelnuts | For garnish |
| Shaved Chocolate | For garnish |
For a delightful cake experience for two, simply follow the instructions and enjoy the scrumptious Chocolate Hazelnut Cake together!
Directions
Preparation Time
Before we dive into the baking process, let’s take a moment to prepare the hazelnuts. This step is crucial as it enhances the flavor of the cake. It will take approximately 15 minutes to prepare the hazelnuts and 20 minutes to roast them. Overall, you’ll need around 35 minutes to get the hazelnuts ready for the recipe.
Step 1: Preparing the Hazelnuts
Start by preheating your oven to 350°F (175°C). Spread the raw hazelnuts on a baking sheet in a single layer. Roast them in the preheated oven for about 15-20 minutes, or until the skins start to crack and turn golden brown. Once roasted, remove them from the oven and let them cool for a few minutes.
To remove the skins, take a clean kitchen towel and wrap the roasted hazelnuts in it. Rub the hazelnuts vigorously within the towel to loosen and remove the skins. Don’t worry if some bits of skin remain; they add a rustic touch to the cake. Once the hazelnuts are skinless, finely grind them in a food processor or a grinder. Set them aside for later use.
Step 2: Making the Cake Batter
Now that our hazelnuts are prepared, let’s move on to the cake batter. In a large mixing bowl, sift together the all-purpose flour, cocoa powder, baking powder, baking soda, and salt. Sifting helps to aerate the dry ingredients and ensures a smooth texture in the final cake.
In a separate bowl, cream the softened butter and granulated sugar together until light and fluffy. Add the eggs, one at a time, and beat well after each addition. Stir in the vanilla extract.
Next, add the finely ground hazelnuts to the wet mixture and mix well. Alternately add the sifted dry ingredients and buttermilk to the wet mixture, starting and ending with the dry ingredients. This step prevents the batter from curdling and ensures an even distribution of ingredients.
Finally, add the cooled brewed coffee to the batter and mix until everything is well combined. The coffee enhances the chocolate flavor and adds depth to the cake.
Step 3: Baking the Cake
Grease and flour two 9-inch round cake pans. Divide the batter equally between the pans. Smooth the tops with a spatula to ensure even baking.
Preheat your oven to 350°F (175°C) and bake the cakes for approximately 25-30 minutes, or until a toothpick inserted into the center comes out clean. Avoid overbaking, as it may result in a dry cake.
Once the cakes are done, remove them from the oven and let them cool in the pans for about 10 minutes. Then, transfer them to a wire rack to cool completely.
Frosting
While the cakes are cooling, it’s time to prepare the luscious frosting that will take this cake to the next level. For this recipe, we’ll make a delightful chocolate-hazelnut frosting that perfectly complements the cake.
Step 4: Chocolate-Hazelnut Frosting
To make the frosting, you’ll need the following ingredients:
- Unsalted Butter: 1/2 cup
- Hazelnut Spread (Nutella): 1/2 cup
- Powdered Sugar: 1 cup
- Heavy Cream: 2-3 tablespoons
- Vanilla Extract: 1/2 teaspoon
- A pinch of Salt
In a large mixing bowl, beat the softened butter until smooth and creamy. Add the hazelnut spread and continue beating until well combined. Gradually add the powdered sugar and beat on low speed until incorporated.
Now, add the heavy cream, vanilla extract, and a pinch of salt to the mixture. Beat on medium-high speed until the frosting is fluffy and spreadable.
Decoration
The best part about baking a cake is the opportunity to get creative with the decoration. For this Chocolate Hazelnut Cake, we recommend keeping it simple yet elegant.
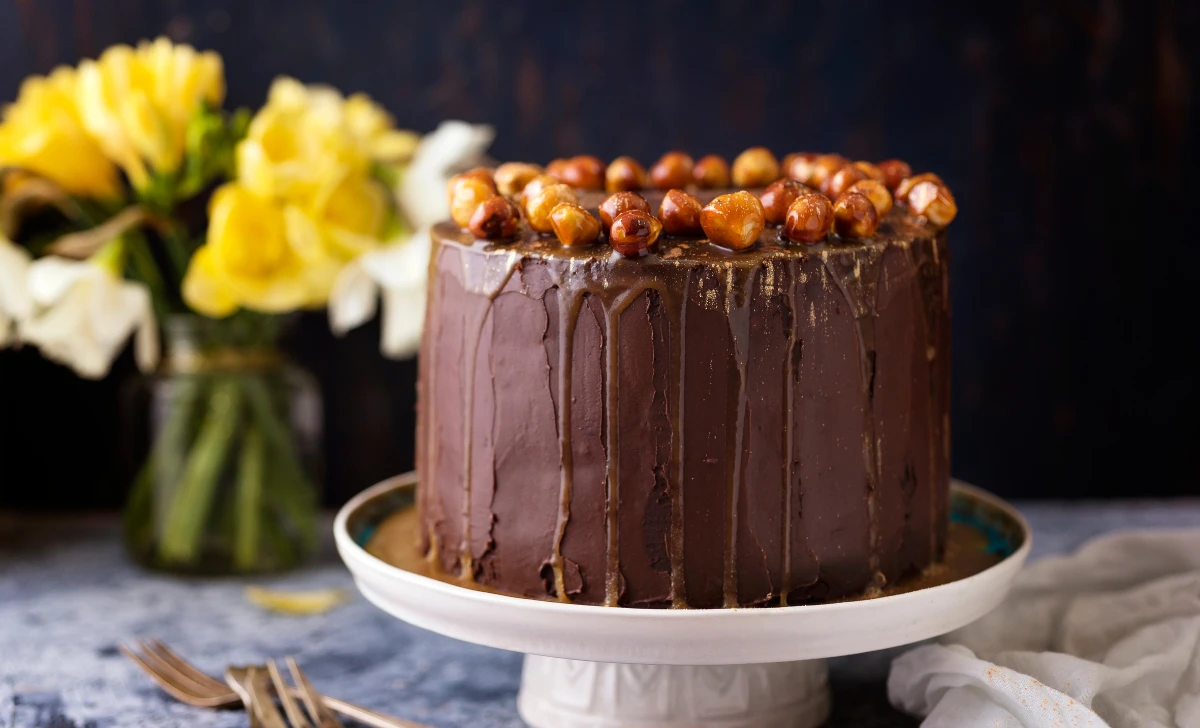
Once the cakes have cooled completely, place one cake layer on a serving plate or cake stand. Spread a generous layer of the chocolate-hazelnut frosting over the top. Carefully place the second cake layer on top of the frosting. Cover the entire cake with the remaining frosting, using a spatula to create smooth and even sides.
For a final touch, garnish the cake with some chopped hazelnuts or shaved chocolate. You can also add a drizzle of melted chocolate on top for an extra indulgent look.
Equipment Required
Nutrition Information
| Nutrition Information | Per Serving (1 slice) |
|---|---|
| Serving Size | 1/10 of the cake |
| Calories | 350 kcal |
| Total Fat | 20g |
| – Saturated Fat | 10g |
| – Trans Fat | 0g |
| Cholesterol | 85mg |
| Sodium | 200mg |
| Total Carbohydrates | 40g |
| – Dietary Fiber | 3g |
| – Sugars | 22g |
| Protein | 6g |
Please note that the nutrition information provided above is an estimate and may vary based on the specific ingredients and quantities used in the recipe. It’s always a good practice to calculate the nutrition values based on the exact ingredients and serving sizes you use. Enjoy your delicious and indulgent slice of Chocolate Hazelnut Cake!
Tips
- Roast Hazelnuts with Care: Keep a close eye on the hazelnuts while roasting to avoid over-browning. Stir them occasionally for even roasting. Let them cool slightly before grinding to ensure a smooth texture.
- Properly Measure Flour: For accurate results, spoon the all-purpose flour into the measuring cup and level it off with a knife. Avoid scooping directly from the bag as it may lead to excess flour and a dense cake.
- Use High-Quality Cocoa Powder: Choose unsweetened cocoa powder with a rich flavor for the best chocolatey taste in the cake.
- Room Temperature Ingredients: Ensure that the butter, eggs, and buttermilk are at room temperature before starting the recipe. This helps in achieving a well-incorporated and smooth cake batter.
- Don’t Overmix the Batter: Once the dry and wet ingredients are combined, mix just until everything is incorporated. Overmixing can result in a tough cake.
- Test for Doneness: To check if the cakes are done baking, insert a toothpick into the center. It should come out with a few moist crumbs, not wet batter.
- Cool Cakes Completely: Allow the cakes to cool fully on a wire rack before frosting. A warm cake can cause the frosting to melt and slide off.
- Frosting Consistency: If the chocolate-hazelnut frosting is too thick, add a bit more heavy cream. If it’s too runny, add more powdered sugar until you achieve a spreadable consistency.
- Customize the Decoration: Get creative with the cake’s appearance! Add some chocolate shavings, hazelnut pieces, or fresh berries for an elegant touch.
Pros & Cons
| Pros | Cons |
|---|---|
| ✔️ Rich and indulgent flavor | ❌ High in calories |
| ✔️ Delightful combination of chocolate and hazelnuts | ❌ Contains saturated fat |
| ✔️ Moist and tender texture | ❌ Not suitable for nut allergies |
| ✔️ Perfect for special occasions | ❌ Requires time for hazelnut preparation |
| ✔️ Customizable with various decorations | ❌ May be challenging for beginner bakers |
Conclusion
In conclusion, the Chocolate Hazelnut Cake recipe is a delightful indulgence that brings together the richness of chocolate and the nutty goodness of hazelnuts in perfect harmony. With its moist and tender texture and luscious chocolate-hazelnut frosting, this cake is sure to tantalize your taste buds and leave you craving for more.
While this recipe may require some time and effort, the end result is well worth it. The roasted hazelnuts infuse the cake with a distinct flavor, while the creamy frosting adds a luxurious touch. Whether you’re celebrating a special occasion or simply treating yourself to a sweet delight, this cake is sure to impress and satisfy.
Get creative with your cake decoration and tailor it to suit your personal preferences. From adding a layer of raspberry jam for a fruity twist to experimenting with different frosting designs, the possibilities are endless.
So, put on your baking apron, gather your ingredients, and embark on a cake-baking adventure that will not only fill your home with the aroma of chocolate but also bring joy to your loved ones. Whether you’re an experienced baker or just starting your culinary journey, this Chocolate Hazelnut Cake recipe promises a rewarding and scrumptious outcome.
Indulge in the exquisite taste of this cake, and share the joy with family and friends. Take pride in creating a dessert that is not only visually stunning but also brings joy to every bite. Embrace the rich flavors, the delightful textures, and the sheer pleasure that this Chocolate Hazelnut Cake brings.
Don’t hesitate to try this delectable recipe, and make it your own with personalized touches. Trust us; the smiles and compliments you’ll receive are well worth the effort. So, let your inner baker shine, and dive into the world of chocolatey decadence and nutty goodness. Happy baking! 🍰😊
Facts
- 🎂 Fact 1: The Nutty Inspiration 🌰
- Did you know that the original inspiration for the Chocolate Hazelnut Cake came from an Italian delicacy called “Torta Gianduia”? This cake, native to the Piedmont region in Italy, combined ground hazelnuts and chocolate, foreshadowing the delightful flavor fusion we know and love today.
- 🍫 Fact 2: The Nutella Connection 🍯
- The famous hazelnut spread, Nutella, played a pivotal role in popularizing the chocolate-hazelnut combo. Created in the 1940s in post-war Italy, Nutella quickly gained a dedicated fanbase and found its way into countless chocolate hazelnut cake recipes worldwide.
- 🌍 Fact 3: A Global Favorite 🌎
- The love for Chocolate Hazelnut Cake spans continents! From Italy to the United States, Germany to Brazil, and beyond, this delectable cake has earned its place in the hearts and taste buds of people worldwide.
- 🚀 Fact 4: Hazelnuts in Space 🪐
- In 1995, the first astronaut to consume Chocolate Hazelnut Cake in space was Dr. Thomas Reiter, a German astronaut aboard the Space Shuttle Discovery. The cake was specially prepared for the mission and brought a moment of culinary delight to the cosmos!
- 📜 Fact 5: Hazelnut Cake through Centuries ⏳
- While the specific combination of chocolate and hazelnuts is relatively modern, hazelnuts themselves have been enjoyed in desserts for centuries. Ancient Greeks and Romans used hazelnuts in various sweet dishes, and they even symbolized wisdom and fertility in Greek mythology!
FAQ’s
Can I use store-bought hazelnut spread instead of Nutella?
Absolutely! You can use any brand of hazelnut spread as a substitute for Nutella in the frosting. Just ensure it has a smooth texture and complements the chocolate flavor.
Can I make the cake ahead of time and freeze it?
Yes, you can make the cake in advance and freeze it. Wrap each cooled cake layer tightly in plastic wrap and aluminum foil before freezing. Thaw the cakes in the refrigerator overnight before frosting and serving.
Is buttermilk essential for this recipe, or can I use regular milk?
Buttermilk adds moisture and acidity to the cake, resulting in a tender crumb. If you don’t have buttermilk, you can make a DIY version by mixing 1 tablespoon of lemon juice or vinegar with 1 cup of milk and letting it sit for 5 minutes before using.
Can I make cupcakes instead of a whole cake?
Absolutely! This recipe can be easily adapted to make delicious chocolate hazelnut cupcakes. Adjust the baking time to around 15-20 minutes, or until a toothpick comes out clean.
How should I store the leftover cake?
Store any leftover cake in an airtight container at room temperature for up to 2 days. For longer storage, refrigerate it for up to 5 days. Bring the cake to room temperature before serving to enjoy its full flavor.
Can I add other nuts to the recipe, like almonds or walnuts?
Absolutely! Feel free to experiment with different nuts to suit your taste. Chopped almonds, walnuts, or even pecans can be a delightful addition to this cake.
Can I make this recipe gluten-free?
Yes, you can make this cake gluten-free by using a gluten-free all-purpose flour blend in place of regular flour. Ensure the blend includes a binding agent like xanthan gum.
Is the cake suitable for vegetarians?
Yes, this Chocolate Hazelnut Cake is suitable for vegetarians, as it doesn’t contain any meat or animal-derived products.
Can I skip the coffee in the recipe?
Yes, you can omit the coffee if you prefer. The coffee enhances the chocolate flavor but can be substituted with an equal amount of hot water if desired.
Can I make this cake without an electric mixer?
Yes, you can make the cake using a whisk or a wooden spoon for mixing. Cream the butter and sugar together vigorously until light and fluffy, and make sure to mix the batter thoroughly for a smooth texture.







Leave a Review