
I used to stress out so much about holiday hosting. I would spend hours baking complicated pastries that often burned while I was getting dressed. Then, last Christmas, I decided to try something different. I wanted something that looked impressive but required zero cooking.
Enter the Santa cheese platter.
When I brought this board out to the living room, the room went silent for a second, and then everyone—especially the kids—started cheering. It looks like a piece of art, but here is the secret: it is just meat and cheese arranged in a clever way. It brings so much joy to the table and serves as a perfect icebreaker. Plus, it tastes just as good as it looks!
Why You’ll Love This Recipe:
- No Cooking Required: You don’t even need to turn on the oven.
- Ready in 15 Minutes: Just slice, arrange, and serve.
- Kid-Friendly: Children love the fun face and the mild cheese flavors.
- Highly Customizable: You can swap the meats and cheeses for whatever you have in the fridge.
- Visual “Wow” Factor: It looks professional, even if you are a beginner.
The Secret Ingredients for an Unforgettable Santa Cheese Platter

The beauty of this recipe is that you can find everything at your local grocery store. You don’t need fancy, expensive ingredients to make this work.
- Pepperoni or Salami: We use these red meat slices to create Santa’s famous red hat. The round shape makes layering very easy.
- White Cheddar or Mozzarella: You will need a block of firm white cheese. We cut this into cubes to create the fluffy white beard.
- Brie or Cream Cheese: To make the “fur” brim of the hat, a rectangular slice of Brie works perfectly because of its white rind. You can also use a block of cream cheese.
- Black Olives: Two pitted black olives are all you need to give Santa his twinkling eyes.
- Savory Cheese Spread: For the face area (under the eyes and nose), I like to use a mixture of cream cheese and chopped peppers. It gives the face a nice color and adds flavor.
Bringing Your Santa Cheese Platter to Life, Step by Step

This is more of an assembly project than a recipe. It is like doing a puzzle, but you get to eat the pieces!
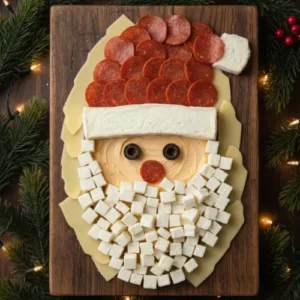
1. Create the Beard Base Start at the bottom of your serving board. Take your cubed white cheese and arrange it in a wide “U” shape. Fill it in with more cubes until it looks like a thick, full beard. Refer to the image above: Notice how we pile the cubes slightly to give the beard some texture and volume.
2. Form the Face Above the beard, spread your savory cream cheese mixture in a semi-circle. This forms Santa’s actual face. If you prefer, you can just use slices of turkey or chicken here for a “skin” tone, but the cheese spread is delicious.
3. Build the Hat At the very top of the board, layer your pepperoni slices. Start wide just above the face and taper it off to the side to look like a floppy stocking cap. Make sure the red slices overlap so you don’t see the board underneath.
4. Add the Brim and Pom-Pom Place a rectangular slice of Brie (or a log of goat cheese) right where the red hat meets the face. This is the white fur brim. If you have a round piece of Brie or a mozzarella ball, place it at the tip of the pepperoni hat for the pom-pom.
5. The Facial Features Place two black olives on the face area for eyes. For the nose, I like to use a large round slice of pepperoni or a whole cherry tomato right in the center.
6. Frame the Board If you have empty space on the sides of the board, fill it in with yellow cheese slices or crackers. This makes the red and white Santa face pop even more!
A Few Pro-Tips for a Perfect Result
I have built this board a few times now, and I have learned a few tricks to make it easier.
- Cube the Cheese Cold: Cut your white cheese while it is cold straight from the fridge. It cuts cleaner and creates sharper cubes for the beard.
- Room Temperature Serving: While you cut it cold, serve the board at room temperature. Cheese tastes much better when it has sat out for about 20 minutes.
- Dry the Olives: Pat your black olives dry with a paper towel before placing them. If they are wet, the black juice might run into the white cheese.
- Use a Template: If you are nervous about the shape, lightly outline Santa’s head on the board with a little bit of honey or jam before you start placing items.
- Add Herbs: Tucking fresh rosemary sprigs around the hat or beard adds a pop of green and smells amazing.
- Buy Pre-Sliced: To save time, buy pre-sliced pepperoni and cheese cubes. It costs a little more but saves you 10 minutes of prep.
- Safety First: According to the USDA, you should not leave perishable food like cheese and meat out at room temperature for more than two hours. Keep this in mind during your party!
Santa Cheese Platter Variations to Try
You can easily tweak this board to fit your diet or taste buds.
- The Vegetarian Santa: Swap the pepperoni hat for rows of red strawberries, raspberries, or cherry tomatoes. It adds a fresh, sweet element that pairs well with cheese.
- The Spicy Santa: Use Pepper Jack cheese cubes for the beard and spicy Calabrese salami for the hat. This gives the platter a nice kick!
- The Vegan Santa: There are amazing plant-based cheeses available now. Use vegan cheese cubes and replace the meat with red bell pepper strips or vegan deli slices.
- The Sweet Santa: Make a dessert version! Use marshmallows for the beard, strawberries for the hat, and a pancake or cookie for the face.
How to Store & Reheat Your Santa Cheese Platter
Since this is a cold appetizer, there is no reheating involved!
Storing Leftovers: If you have leftovers (which is rare!), simply disassemble the face. Place the cheese in one airtight container and the meat in another. They will keep in the fridge for 3-4 days.
Make-Ahead: You can assemble this entire Santa cheese platter up to 4 hours before your party. Just wrap the entire board tightly in plastic wrap to keep the cheese from drying out and store it in the fridge.
Perfect Pairings for Santa Cheese Platter
Since this is a rich, savory appetizer, you want drinks and sides that complement it.
- Drinks: A crisp white wine like Sauvignon Blanc cuts through the fat of the cheese. For a non-alcoholic option, our Festive Cranberry Punch Recipe is a hit.
- Sides: This platter is mostly protein, so serve it with a basket of crunch. Our Homemade Rosemary Crackers Recipe would be the perfect vehicle for the cheese.
Frequently Asked Questions (FAQ)
What is the best cheese for the beard?
White cheddar is my favorite because it is firm and keeps its cube shape well. Mozzarella works too, but it is softer. Monterey Jack is another good white option.
Can I make this on a round board?
Yes! A round board works perfectly. Just curve the beard to follow the bottom edge of the circle and let the hat flop over the top curve.
How much cheese do I need?
For a standard party of 8-10 people, you will need about 1 pound of cubed cheese for the beard and 8 ounces of sliced meat.
Can I use crackers on the board itself?
Absolutely. You can use white crackers to build the beard instead of cheese if you want to save money or offer more crunch.
Is this recipe gluten-free?
The meat and cheese are naturally gluten-free. Just ensure you check the labels on your pepperoni and serve gluten-free crackers on the side.
What can I use for the face skin color?
If you don’t want to use a cheese spread, you can use slices of mild provolone (it’s slightly off-white) or even a layer of hummus.
How do I keep the hat from sliding?
If you are traveling with the board, simple overlapping usually holds the meat in place. However, a dab of cream cheese on the back of the pepperoni acts like “glue” to hold it to the board.
Can I add fruit?
Yes! Green grapes make a great border around Santa. Red grapes can be mixed into the hat for texture.
What if I don’t like olives?
You can use blueberries, raisins, or even two chocolate chips for the eyes instead of olives.
Is this expensive to make?
Not at all. Compared to fancy charcuterie boards with expensive jams and pâtés, this uses standard deli ingredients, making it very budget-friendly.
Santa Cheese Platter
Equipment
- Large Wooden Board or Platter
- Knife
- Paper Towels
Ingredients
- 6 oz Pepperoni Slices (for the hat)
- 1 block White Cheddar Cheese (cubed, for the beard)
- 1 slice Brie Cheese (rectangular, for the hat brim)
- 8 oz Cream Cheese Spread (mixed with pimentos or plain, for the face)
- 2 whole Black Olives (pitted, for eyes)
- 1 large slice Pepperoni or Cherry Tomato (for the nose)
- 1 cup Crackers (for serving)
Instructions
- Prep: Cube the white cheddar cheese and slice the Brie into a rectangle.
- Beard: Arrange the white cheddar cubes at the bottom of the board in a wide "U" shape to form Santa's beard. Pile them up for texture.
- Face: Spread the cream cheese mixture in a semi-circle just above the beard to create the face.
- Hat: Layer the pepperoni slices starting at the top of the face and working upwards, tapering to the side to create a hat shape.
- Brim: Place the rectangular slice of Brie between the pepperoni and the face spread to act as the hat's fur brim.
- Features: Place the two black olives on the face for eyes and the large pepperoni round or tomato for the nose.
- Serve: Fill in any empty space on the board with crackers or extra cheese slices. Serve immediately.
Notes
Conclusion
This Santa cheese platter is proof that holiday food doesn’t have to be stressful to be spectacular. With just a few simple ingredients and a little creativity, you can create a centerpiece that sparks joy and conversation. It’s fun, festive, and delicious.
Ready for your next kitchen adventure? Explore more delicious recipes here at SpoonnSpice!