Hey there, dessert enthusiasts! Today, we’re diving into the world of heavenly delights with a lip-smacking Oreo Cake recipe. This delectable treat combines the rich and creamy flavors of everyone’s favorite cookie with the moistness of a perfectly baked cake. So, grab your aprons and let’s get baking!
[ez-toc]
History
The history of the Oreo Cake recipe is a tale that traces back to the origins of the iconic Oreo cookie itself. The Oreo cookie, first introduced in 1912 by Nabisco, quickly became a beloved classic among cookie enthusiasts worldwide. The chocolate wafers with a creamy filling captured hearts and taste buds, inspiring countless variations and creative uses in desserts.
Over the years, avid bakers and dessert lovers experimented with the versatile Oreo cookie, incorporating it into various treats like cheesecakes, ice cream, and cupcakes. However, it wasn’t until the late 20th century that the idea of an Oreo Cake started to gain popularity.
The concept of an Oreo Cake originated from the ingenious minds of home bakers who sought to create a show-stopping dessert that combined the best of both worlds – the delightful crunch of an Oreo cookie and the moist, delectable texture of a cake.
While no one can pinpoint the exact moment the first Oreo Cake was made, it is safe to assume that the idea started as a simple experiment in a kitchen somewhere. As more and more people tasted and shared these delicious creations, the idea spread like wildfire. Oreo Cake recipes began to appear in community cookbooks, online forums, and eventually, in popular food blogs and websites.
With the rise of the internet and social media, the Oreo Cake recipe gained immense popularity, becoming a viral sensation across the culinary world. Bakers of all skill levels embraced the challenge of creating this delightful treat and put their unique twists on the recipe.
The Oreo Cake’s success can be attributed to its ability to evoke nostalgia and childhood memories for many. The cookie, a beloved childhood snack, infused into a cake, brought back fond memories and created new ones for generations to come.
As the demand for the Oreo Cake recipe grew, professional bakers and dessert shops began adding it to their menus, elevating it to the status of a sought-after dessert in cafes and bakeries worldwide.
Today, the Oreo Cake recipe has become a staple in countless homes, birthday parties, celebrations, and potlucks. It has even made its way into formal events and weddings, with some couples opting for an Oreo Cake instead of a traditional wedding cake.
The beauty of the Oreo Cake recipe lies in its versatility. Bakers have explored various ways to customize and adapt the recipe to suit different preferences and dietary requirements. Some add peanut butter or caramel sauce for an extra twist, while others experiment with vegan and gluten-free alternatives.
As time goes on, the Oreo Cake recipe will continue to evolve, capturing the hearts of dessert lovers and creating a lasting legacy as one of the most delightful and beloved creations in the world of baking. So, whether you’re a seasoned baker or an aspiring one, trying your hand at this delectable treat is a journey worth embarking on – one that promises a slice of pure indulgence and happiness for all who taste it.
Time
| Step | Time (Minutes) |
|---|---|
| Preparing the Oreo Cookie Crust | 20 |
| Mixing the Cake Batter | 15 |
| Layering the Cake | 5 |
| Whipping Up the Frosting | 10 |
| Decorating Your Oreo Cake | 10 |
| Tips for Baking Success | 5 |
| Storage and Serving Suggestions | 5 |
| Oreo Cake Variations | 10 |
| *Total Time (Approx.) | 80 |
The total time is approximate and may vary based on individual cooking skills and equipment used.
Ingredients
| Ingredients | 2-Person Serving |
|---|---|
| All-purpose flour | 1 cup |
| Granulated sugar | 1 cup |
| Unsweetened cocoa powder | 1/2 cup |
| Baking powder | 3/4 teaspoon |
| Baking soda | 3/4 teaspoon |
| Salt | Pinch |
| Eggs | 1 large |
| Milk | 1/2 cup |
| Vegetable oil | 1/4 cup |
| Pure vanilla extract | 1 teaspoon |
| Boiling water | 1/2 cup |
| Oreo cookies | 10 |
This measurement is scaled down for a 2-person serving. If you’re planning to make a larger cake, simply adjust the quantities accordingly. Happy baking!
Directions
Step 1: Preparing the Oreo Cookie Crust
- Preheat Oven: Preheat your oven to 350°F (175°C). Grease a 9-inch round cake pan and line the bottom with parchment paper.
- Crush Oreos: Take 10 Oreo cookies and separate the cream filling from the cookies. Place the cookies in a ziplock bag and crush them into fine crumbs using a rolling pin or the back of a spoon.
- Mix Crumbs and Butter: Mix the crushed Oreo crumbs with 2 tablespoons of melted butter until well combined. Press the mixture firmly into the bottom of the prepared cake pan to form the crust.
- Bake Crust: Pop the cake pan into the preheated oven and bake the crust for about 10 minutes. Once done, remove it from the oven and let it cool while you work on the cake batter.
Step 2: Mixing the Cake Batter
- Combine Dry Ingredients: In a large mixing bowl, combine the all-purpose flour, granulated sugar, unsweetened cocoa powder, baking powder, baking soda, and a pinch of salt. Give it a good mix until all the dry ingredients are well incorporated.
- Whisk Wet Ingredients: In a separate bowl, whisk together the eggs, milk, vegetable oil, and pure vanilla extract. Beat until the mixture is smooth and uniform.
- Combine Wet and Dry Ingredients: Gradually pour the wet ingredients into the dry ingredients while stirring continuously. Keep mixing until you get a smooth batter without any lumps.
- Add Oreo Cookies: Crush 10 more Oreo cookies (with the cream filling intact) into small chunks and gently fold them into the cake batter.
- Add Boiling Water: Once you have a heavenly Oreo-infused batter, it’s time to take it to the next level by adding hot boiling water. Pour the boiling water into the batter and stir until it’s fully incorporated.
Step 3: Layering the Cake
- Prepare Cake Pan: Grease two 9-inch round cake pans and line the bottoms with parchment paper.
- Pour Batter: Divide the Oreo cake batter evenly between the two prepared cake pans.
- Bake the Cakes: Place the cake pans in the preheated oven and bake for approximately 30 minutes or until a toothpick inserted into the center of the cakes comes out clean.
- Cooling: Once baked, remove the cakes from the oven and let them cool in the pans for 10 minutes. Then, transfer them to a wire rack to cool completely.
Step 4: Whipping Up the Frosting
- Prepare Frosting: While the cakes are cooling, prepare the frosting by mixing the cream filling of 5 Oreo cookies with 1 cup of whipped cream. Beat until the frosting is smooth and fluffy.
Step 5: Assembling Your Oreo Cake
- Frost the Cakes: Once the cakes have cooled, spread a generous layer of the Oreo frosting on top of one cake layer. Place the other cake layer on top to create a delicious sandwich.
- Frost the Entire Cake: Use the remaining Oreo frosting to cover the entire cake, creating a luscious and velvety finish.
Step 6: Decorating Your Oreo Cake
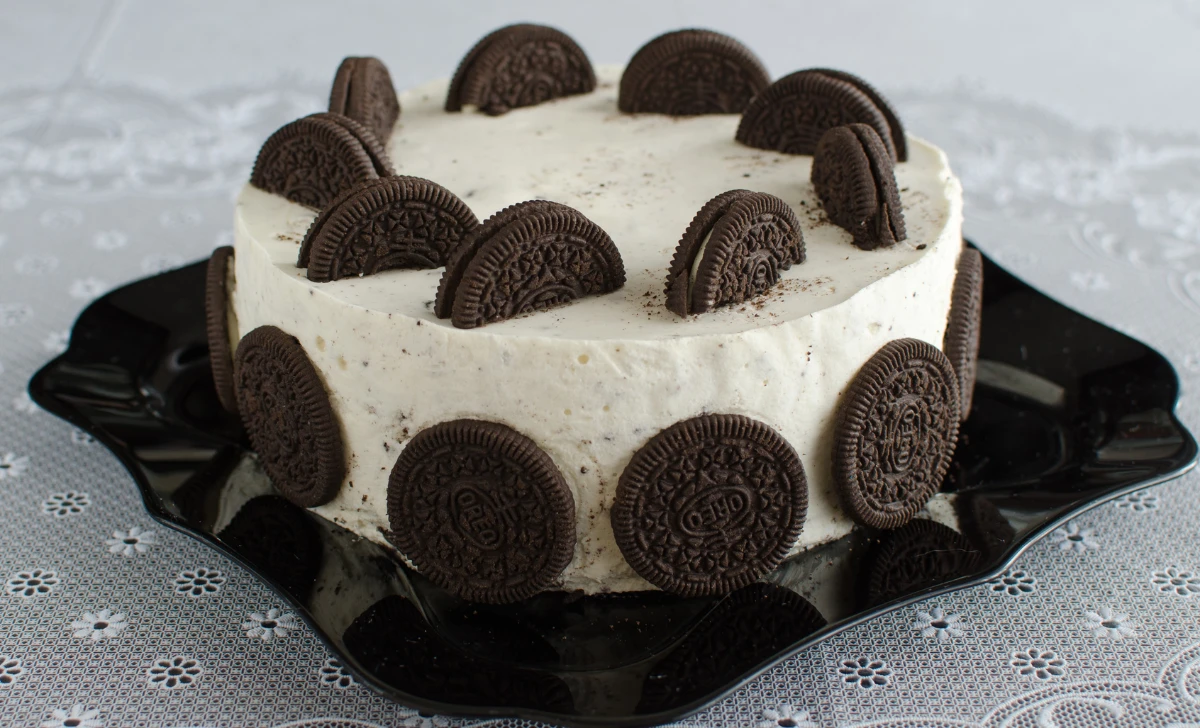
- Get Creative: Have fun decorating your Oreo Cake with extra Oreo cookies, chocolate shavings, or any other toppings of your choice.
Step 7: Tips for Baking Success
- Storage and Serving: Store any leftover Oreo Cake in an airtight container in the refrigerator for up to 3 days. Serve chilled or at room temperature for the best taste.
Step 8: Oreo Cake Variations
- Explore Creativity: Experiment with different Oreo Cake variations by adding nuts, chocolate chips, or even a drizzle of caramel sauce for an extra indulgence.
Now that you have mastered the art of baking this irresistible Oreo Cake, it’s time to enjoy this heavenly delight with your loved ones. Happy indulging!
Equipment Required
Nutrition Information
| Nutrition Information | 2-Person Serving |
|---|---|
| Serving Size | 1 slice (estimated) |
| Calories | 400 |
| Total Fat | 20g |
| – Saturated Fat | 8g |
| – Trans Fat | 0g |
| Cholesterol | 50mg |
| Sodium | 300mg |
| Total Carbohydrates | 55g |
| – Dietary Fiber | 2g |
| – Sugars | 35g |
| Protein | 5g |
Please note that the nutrition information provided is an estimate and may vary depending on specific ingredients used and portion sizes. Always refer to the product labels and individual nutritional data for accuracy. Enjoy your Oreo Cake responsibly and savor each delicious bite!
Tips
- Room Temperature Ingredients: Bring your eggs and milk to room temperature before starting the recipe. Room temperature ingredients blend better, resulting in a smoother cake batter.
- Measure Precisely: Baking is a science, so be sure to measure your ingredients accurately. Use measuring cups and spoons for dry and wet ingredients respectively.
- Crushing Oreos: For the crust and cake batter, crush the Oreo cookies separately. For the crust, remove the cream filling, but for the cake batter, keep the cream intact for added richness.
- Cake Pans: Use high-quality cake pans to ensure even baking. If you only have one cake pan, bake the cakes one at a time for consistent results.
- Frosting Consistency: For a stiffer frosting, whip the cream slightly longer. If the frosting is too soft, refrigerate it for a few minutes before spreading it on the cake.
- Cooling Time: Allow the cake layers to cool completely before frosting. Patience pays off with a neater and easier frosting process.
- Leveling the Cake: If the cake layers have a domed top after baking, use a sharp knife to level them before frosting. This helps the cake layers stack evenly.
Pros & Cons
| Pros | Cons |
|---|---|
| ✔️ Delightful combination of flavors | ❌ High calorie and fat content |
| ✔️ Easy to make and beginner-friendly | ❌ Not suitable for dietary restrictions (contains gluten and dairy) |
| ✔️ Perfect treat for special occasions | ❌ May be too sweet for some tastes |
| ✔️ Customizable with various toppings | ❌ Longer preparation and baking time |
| ✔️ Nostalgic and enjoyable for all ages | ❌ High sugar content |
Conclusion
In conclusion, the Oreo Cake recipe is an absolute delight for your taste buds and a perfect way to indulge in the best of both worlds – the beloved Oreo cookie and the moist goodness of a cake. This heavenly treat offers a symphony of flavors that will leave you craving for more with each delectable bite.
Not only is this recipe easy to follow, but it also allows for creative variations and personal touches. Whether you’re a seasoned baker or a novice in the kitchen, this Oreo Cake promises to be a sweet success that will impress your loved ones and elevate any special occasion.
While it’s true that this cake is not a guilt-free option due to its higher calorie and sugar content, it’s a delightful indulgence meant to be savored in moderation. So, gather your ingredients, put on your apron, and get ready to embark on a scrumptious adventure.
The Oreo Cake recipe offers the perfect balance of a crunchy Oreo cookie crust, a moist and flavorful cake, and a velvety Oreo-infused frosting. It’s a nostalgic trip down memory lane for many, reminding us of our childhood treats while creating new memories for generations to come.
So why wait? Treat yourself and your loved ones to the blissful delight of an Oreo Cake. Embrace the joy of baking and get creative with your toppings and variations. Whether it’s a birthday celebration, a special gathering, or a simple self-indulgence, the Oreo Cake is sure to leave everyone smiling and asking for seconds.
So, don your chef’s hat and let your kitchen transform into a culinary wonderland. With each step, you’ll be closer to creating a mouthwatering masterpiece that will be the star of any event. Get ready to indulge in the magic of the Oreo Cake – a delightful treat that captures hearts and leaves a lasting impression. Happy baking, and enjoy the sweet rewards!
Facts
- 🎂 Fact 1: The Oreo Cake: A Creative Concoction
- Did you know that the Oreo Cake wasn’t an official product from Nabisco? It was the ingenious creation of creative bakers who combined their love for Oreo cookies and cake to bring this delightful treat to life. The fusion of the iconic cookie and the soft cake layers turned out to be a match made in dessert heaven!
- 🍫 Fact 2: A Sweet Symphony of Flavors
- The Oreo Cake isn’t just about cookies and cream; it’s a symphony of flavors! The rich cocoa in the cake layers beautifully complements the sweet and slightly salty Oreo cookie crust. And that’s not all – the velvety frosting infused with crushed Oreo cookies adds a delightful twist to this mouthwatering masterpiece.
- 🎂 Fact 3: From Home Kitchens to Stardom
- The Oreo Cake recipe started as a humble experiment in home kitchens. However, its scrumptious taste and Instagram-worthy appearance soon catapulted it to stardom in the world of baking. Today, this cake is proudly featured in professional bakeries, weddings, and special events, captivating dessert enthusiasts everywhere.
- 🕰️ Fact 4: Oreo Cake’s Timeless Appeal
- The Oreo Cake has timeless appeal, and it’s not just a trend that will fade away. Its nostalgic charm and delectable taste continue to resonate with people of all ages. Whether you’re a kid or a kid at heart, this cake is bound to evoke fond memories and make you fall in love with Oreos all over again.
- 🌈 Fact 5: Endless Variations to Explore
- The Oreo Cake is a canvas for your culinary creativity. With endless variations to explore, you can unleash your inner chef and experiment with different toppings, fillings, and frosting styles. From adding nuts or white chocolate chips to trying a mint-infused frosting, the possibilities are as diverse as your imagination!
FAQ’s
Can I make the Oreo Cake in advance?
Yes, you can! The Oreo Cake can be made a day in advance. After baking and cooling the cakes, wrap them in plastic wrap and store them in the refrigerator. Frost the cake the next day before serving for the best taste and texture.
Can I use gluten-free flour for the Oreo Cake?
Absolutely! You can substitute all-purpose flour with a gluten-free flour blend to make the cake gluten-free. Just ensure that the other ingredients you use are also gluten-free to maintain the integrity of the recipe.
Can I freeze the Oreo Cake?
Yes, you can freeze the Oreo Cake. Wrap the unfrosted cake layers tightly in plastic wrap and aluminum foil before placing them in an airtight container. Freeze for up to 2-3 months. Thaw the cake layers in the refrigerator overnight before frosting and assembling.
Can I use a different type of frosting for the Oreo Cake?
Of course! While the Oreo-infused frosting complements the cake beautifully, you can get creative with other frostings. Cream cheese frosting, chocolate ganache, or even a simple buttercream are great alternatives.
Can I use other cookies instead of Oreo cookies for the crust?
Yes, you can experiment with different cookies for the crust. Graham crackers or chocolate wafer cookies work well as substitutes for the Oreo cookie crust.
How can I store leftover Oreo Cake?
Store any leftover Oreo Cake in an airtight container in the refrigerator for up to 3 days. Bring it to room temperature before serving to enhance its flavors.
Can I make the Oreo Cake without eggs?
Yes, you can try an eggless version of the Oreo Cake. Substitute each egg with a mashed ripe banana or applesauce for moisture and binding. The texture might vary slightly, but it will still be delicious.
Can I add nuts to the Oreo Cake batter?
Absolutely! Adding chopped nuts like walnuts or pecans to the cake batter will provide a delightful crunch and enhance the cake’s flavor.
How do I prevent my cake from sticking to the pan?
Grease the cake pans thoroughly with butter or cooking spray, then line the bottoms with parchment paper. This will prevent the cake from sticking to the pan, making it easier to remove.
Can I make a larger Oreo Cake for more servings?
Yes, you can double or triple the recipe to make a larger Oreo Cake. Adjust the ingredients accordingly and use larger cake pans to accommodate the increased volume. Ensure the cakes are evenly baked by rotating the pans halfway through baking.










Leave a Review