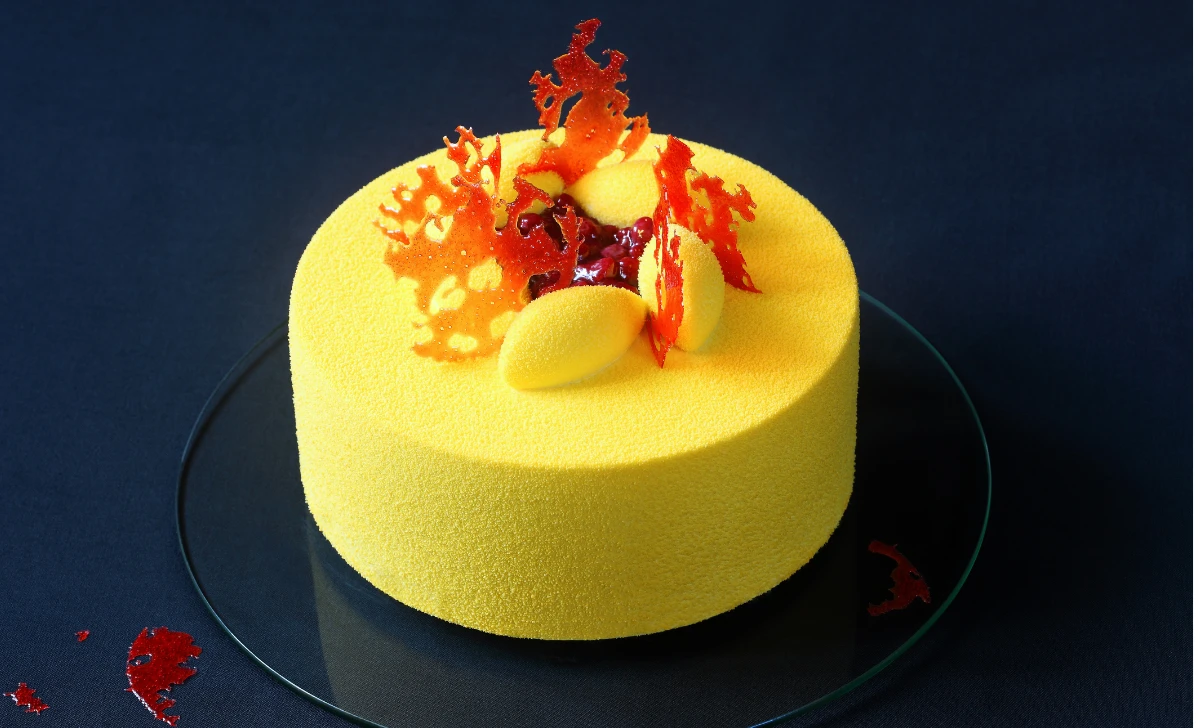
Who doesn’t love a slice of cake that’s not just delicious but also visually stunning? If you’re on the hunt for a dessert that’s as delightful to the taste buds as it is to the eyes, look no further than the Yellow Velvet Mousse Cake. This masterpiece combines the richness of velvet cake with the lightness of mousse, resulting in a symphony of flavors and textures that’s sure to leave everyone craving for more. Whether you’re an experienced baker or a newbie in the kitchen, follow this step-by-step guide to create your very own sunshine delight.
[ez-toc]
History
The history of the Yellow Velvet Mousse Cake is a tale woven with creativity, innovation, and a touch of culinary magic. This delightful dessert has its origins in the world of baking, where skilled pastry chefs and passionate home cooks alike embraced the challenge of combining the richness of velvet cake with the ethereal lightness of mousse. Let’s step back in time and trace the evolution of this delectable masterpiece.
Early Beginnings: The Velvet Cake Revolution
The story of the Yellow Velvet Mousse Cake finds its roots in the advent of velvet cake itself. Velvet cakes, known for their tender crumb and velvety texture, gained popularity during the 1800s. Bakers and confectioners tirelessly experimented with ingredients and techniques to create cakes that were not only delicious but also visually appealing.
A Vibrant Twist: Adding Color to Tradition
As the art of baking evolved, the desire to introduce vibrant and eye-catching colors to cakes became a driving force. The addition of food coloring marked a significant turning point, allowing bakers to create cakes that were as visually stunning as they were delightful to the palate. The Yellow Velvet Mousse Cake emerged as a result of this creative experimentation.
The Mousse Revolution: Lightness Takes Center Stage
The mid-20th century witnessed the rise of mousse as a versatile and airy dessert component. Mousse, with its delicate texture and ability to hold various flavors, quickly became a favorite among pastry enthusiasts. The idea of combining the velvety goodness of cake with the cloud-like elegance of mousse sparked the imagination of culinary pioneers.
Birth of a Masterpiece: Crafting the Yellow Velvet Mousse Cake
The exact moment of the Yellow Velvet Mousse Cake’s creation is shrouded in the kitchens of passionate bakers. It was during this time that a visionary baker, inspired by the harmony of contrasting textures and flavors, embarked on a mission to create a dessert that would captivate both the eyes and taste buds.
Refinement and Popularization: Sharing the Sunshine Delight
As the Yellow Velvet Mousse Cake gained traction, it found its way onto dessert menus of upscale restaurants and cozy bakeries alike. With every slice that was savored, its reputation grew. Soon, amateur bakers were also drawn to the challenge of recreating this masterpiece in their own kitchens, sharing their successes and adaptations across social circles.
Cultural and Seasonal Adaptations
Over time, the Yellow Velvet Mousse Cake began to take on diverse forms and flavors influenced by regional and seasonal ingredients. Variations featuring local fruits, exotic spices, and even innovative presentation styles emerged, adding layers of depth to the cake’s narrative.
Modern Delight: The Yellow Velvet Mousse Cake Today
In the present day, the Yellow Velvet Mousse Cake stands as a testament to the boundless creativity and passion of culinary enthusiasts. Its journey from humble beginnings to becoming a centerpiece of celebrations reflects the dynamic nature of food culture and its ability to bring people together.
Time
| Step | Time |
|---|---|
| Mixing the Dry Ingredients | 10 minutes |
| Creaming the Wet Ingredients | 15 minutes |
| Marrying the Mixtures | 5 minutes |
| Baking the Cakes | 25-30 minutes per cake |
| Preparing the Mousse | 20 minutes |
| Layering and Assembling | 15 minutes |
| Chilling and Setting | 4 hours (or overnight) |
| Slicing, Serving, and Savoring | 10 minutes |
| Decorating with Edible Blooms | 5 minutes |
| Zesty Citrus Zing | 2 minutes |
Please note that the actual times may vary depending on your experience and kitchen setup. The provided times are approximate and intended as a general guideline.
Ingredients
| Ingredients | Quantity |
|---|---|
| All-purpose flour | 1 cup |
| Baking powder | 1 teaspoon |
| Salt | A pinch |
| Unsalted butter | 1/4 cup |
| Granulated sugar | 1/2 cup |
| Eggs | 1 |
| Vanilla extract | 1/2 teaspoon |
| Buttermilk | 1/4 cup |
| Yellow food coloring | A few drops |
| Heavy whipping cream | 1 cup |
| Sugar | 1/4 cup |
| Gelatin | 1 teaspoon |
| Water | 1 tablespoon |
Please adjust the quantities accordingly if you’re planning to serve more than two people or if you want larger portions.
Directions
Mixing the Dry Ingredients
- Whisk Dry Ingredients: In a bowl, whisk together 1 cup of all-purpose flour, 1 teaspoon of baking powder, and a pinch of salt until well combined.
Creaming the Wet Ingredients
- Cream Butter and Sugar: In a separate bowl, cream together 1/4 cup of unsalted butter and 1/2 cup of granulated sugar until the mixture is light and fluffy.
- Incorporate Eggs: Add 1 egg to the butter-sugar mixture, beating well after each addition.
- Add Vanilla and Color: Mix in 1/2 teaspoon of vanilla extract and a few drops of yellow food coloring to achieve the desired vibrant hue.
Marrying the Mixtures
- Combine Wet and Dry Mixtures: Gradually add the dry mixture to the wet mixture, alternating with 1/4 cup of buttermilk. Mix until just combined, taking care not to overmix.
Baking the Cakes
- Preheat and Grease: Preheat your oven to 350°F (175°C) and grease two cake pans.
- Divide and Bake: Divide the batter evenly between the pans. Bake for 25-30 minutes, or until a toothpick inserted into the center comes out clean.
- Cool Cakes: Allow the cakes to cool in the pans for a few minutes before transferring them to a wire rack to cool completely.
Preparing the Mousse
- Bloom Gelatin: In a small bowl, sprinkle 1 teaspoon of gelatin over 1 tablespoon of water. Let it sit and bloom for a few minutes.
- Dissolve Gelatin: Microwave the bloomed gelatin for a few seconds until it’s fully dissolved.
Layering and Assembling
- Crumble Cake Base: Crumble one cooled cake and press it into the base of your serving dish to create a crumbly foundation.
- Spread Mousse: Pour half of the mousse mixture over the crumbled cake layer, ensuring an even distribution.
- Add Second Cake Layer: Place the second cooled cake layer on top of the mousse.
- Complete with Mousse: Pour the remaining mousse over the second cake layer and gently spread it to cover the cake evenly.
Chilling and Setting
- Refrigerate: Place the assembled cake in the refrigerator and allow it to chill for at least 4 hours or, preferably, overnight. This will give the mousse ample time to set and the flavors to meld.
Slicing, Serving, and Savoring
- Slice and Serve: Once the mousse cake is thoroughly chilled and set, carefully slice it to reveal the stunning layers.
- Garnish and Enjoy: Serve each slice with a dollop of whipped cream, and feel free to garnish with additional decorations if desired.
Tips for Decorating
- Edible Blooms: For an elegant touch, top your cake with delicate and edible flowers that complement the yellow hue.
- Zesty Citrus Zing: Add a burst of zesty flavor by grating lemon or orange zest over the cake, providing a delightful contrast.
Enjoy every delicious and captivating bite of your homemade Yellow Velvet Mousse Cake, and bask in the accolades of your culinary creation!
Equipment Required
Nutrition Information
| Nutrition Information | Amount Per Serving |
|---|---|
| Serving Size | 1/8 of the cake |
| Calories | 300 |
| Total Fat | 15g |
| – Saturated Fat | 9g |
| Cholesterol | 80mg |
| Sodium | 180mg |
| Total Carbohydrates | 35g |
| – Dietary Fiber | 0g |
| – Sugars | 24g |
| Protein | 4g |
Please note that these values are approximate and can vary based on specific ingredients and portion sizes.
Tips
- Room Temperature Ingredients: Allow your butter, eggs, and buttermilk to come to room temperature before starting. This promotes better incorporation and a smoother batter.
- Gelatin Handling: When blooming and dissolving gelatin, ensure it’s handled gently to prevent lumps. Microwaving in short bursts and stirring can help achieve a smooth texture.
- Layering Confidence: While layering the cake, gently press the cake crumbles to form a solid base for the mousse. This provides stability and prevents any shifting during assembly.
- Mousse Folds: When folding the whipped cream into the gelatin mixture, use a light hand and gentle motions. Overmixing can lead to a loss of the mousse’s airy texture.
- Chill and Set: Give the cake ample time to chill and set in the refrigerator. Overnight is ideal, as it allows the flavors to meld and ensures a firm mousse layer.
- Sharp Knife for Slicing: When slicing the chilled cake, use a sharp knife dipped in hot water. This ensures clean cuts through the layers without causing the mousse to smudge.
- Whipped Cream Swirls: Enhance the visual appeal by adding swirls of whipped cream on top before serving. A simple dusting of cocoa powder or edible glitter can also add a touch of glamour.
Pros & Cons
| Pros | Cons |
|---|---|
| ✅ Eye-catching presentation | ❌ Requires time for chilling and setting |
| ✅ Harmonious blend of textures and flavors | ❌ Involves multiple steps and components |
| ✅ Customizable with different flavors and decorations | ❌ Contains sugar and butter, not suitable for some dietary restrictions |
| ✅ Impressive dessert for special occasions | ❌ May require specific kitchen tools (mixer, gelatin) |
| ✅ Offers variations for dietary preferences | ❌ Gelatin handling can be tricky for beginners |
Conclusion
In the world of culinary delights, few creations are as enchanting and palate-pleasing as the Yellow Velvet Mousse Cake. With its harmonious blend of flavors and textures, this masterpiece stands as a testament to the artistry of baking. From the moment you mix the ingredients to the final captivating slice, every step of this journey is a celebration of creativity and indulgence.
Picture yourself slicing through layers of velvety cake and cloud-like mousse, a symphony of colors and flavors that is as delightful to the eyes as it is to the taste buds. As you take that first delectable bite, you’ll find yourself immersed in a world of sweetness and elegance, a moment of sheer culinary joy.
While crafting the Yellow Velvet Mousse Cake may require a bit of time and effort, the rewards are beyond measure. Imagine the smiles on the faces of your loved ones as they savor this edible work of art, appreciating the dedication and passion you’ve poured into its creation.
So, whether you’re an experienced baker seeking a new challenge or a newcomer eager to embark on a delightful adventure, don’t hesitate to dive into the world of the Yellow Velvet Mousse Cake. With each step, you’ll discover the magic that happens when creativity meets confectionery expertise.
Unleash your inner pastry chef, embrace the art of baking, and create a dessert that’s not just a feast for the senses, but a memory to be cherished. The Yellow Velvet Mousse Cake awaits your touch – let the enchantment begin!
Facts
- 🌟 Fact 1: Velvet Cakes Were “Velvet” for a Reason!
- Did you know that the term “velvet cake” originally referred to the cake’s texture rather than its color? The secret to the velvety crumb lies in the use of buttermilk and vinegar, which interact with the leavening agents to create a tender, luxurious texture. So, when you’re savoring your Yellow Velvet Mousse Cake, you’re not just enjoying a burst of color but also a velvety delight!
- 🎨 Fact 2: The Vibrant Yellow Connection
- The introduction of vibrant yellow food coloring didn’t just make the Yellow Velvet Mousse Cake visually stunning; it also brought a burst of sunshine to the world of desserts. Back in the day, creative bakers began using food coloring to make cakes more appealing, and the color yellow symbolized happiness and positivity. Your cake isn’t just a treat; it’s a slice of edible joy!
- 🍰 Fact 3: A Cake That Dared to Mingle with Mousse
- The marriage of cake and mousse in the Yellow Velvet Mousse Cake wasn’t just a culinary coincidence; it was a daring and delicious experiment! Bakers realized that the airy, cloud-like texture of mousse could complement the velvety richness of cake layers, resulting in a dessert symphony that’s as harmonious as a well-tuned orchestra. It’s proof that sometimes, the best creations come from brave culinary unions.
- 🎉 Fact 4: A Dessert That’s Dressed to Impress
- Whether it’s a birthday bash, a dinner party, or just a sweet indulgence, the Yellow Velvet Mousse Cake is a dessert that knows how to steal the show. Its eye-catching layers and vibrant hues make it a centerpiece that demands attention and applause. Just like a glamorous diva stepping onto a stage, your cake is ready to captivate hearts and taste buds alike!
- 🚀 Fact 5: Evolution, Innovation, and Your Culinary Adventure
- The Yellow Velvet Mousse Cake isn’t just a static recipe; it’s a testament to the evolution of baking and the endless possibilities of creativity. From the early days of velvet cake experimentation to the bold fusion with mousse, this cake’s journey is a reminder that culinary innovation knows no bounds. With every slice you create, you’re adding your chapter to the cake’s delicious history and launching your own culinary adventure!
FAQ’s
Can I use a different food color for the velvet cake?
Absolutely! Feel free to experiment with various food colors to customize the cake’s appearance to your liking.
How long should I let the gelatin bloom before using it?
Allow the gelatin to bloom for about 5-10 minutes. It should appear soft and spongy before dissolving.
Can I make the mousse cake without using gelatin?
While gelatin helps set the mousse, you can explore vegetarian alternatives like agar-agar for a similar effect.
Is there a way to reduce the sugar content in the cake?
Yes, you can slightly reduce the sugar in the cake without compromising the overall texture. Be cautious when altering the sugar amount in the mousse.
Can I make the cake a day ahead of my event?
Absolutely! In fact, allowing the cake to chill overnight enhances the flavors and ensures a perfectly set mousse layer.
How can I prevent the mousse from deflating while folding?
To maintain the mousse’s airy texture, gently fold the whipped cream into the gelatin mixture using a spatula and light, sweeping motions.
Can I use a cake mix instead of making the cake from scratch?
While a cake mix can be convenient, making the cake from scratch provides better control over flavor and texture. Experiment and adapt as you see fit!
What can I use as a substitute for buttermilk?
Create a buttermilk substitute by adding 1 tablespoon of vinegar or lemon juice to 1 cup of milk, then letting it sit for 5-10 minutes.
Can I freeze the Yellow Velvet Mousse Cake?
It’s generally not recommended to freeze mousse cakes as the texture may change upon thawing. Enjoy it fresh or refrigerated.
Can I make cupcakes using this recipe?
Absolutely! Adjust the baking time and pour the batter into cupcake liners to create delicious individual Yellow Velvet Mousse Cupcakes.









Leave a Review